Laptop LCD Lines
Laptop LCD lines ruin 1 in every 8 laptop screens brought into repair shops, according to iFixit’s 2024 device failure data. Most owners assume the display is dead and head straight for a replacement. That assumption costs them hundreds of dollars they did not need to spend.
This guide targets laptop LCD lines specifically: what causes them, how to confirm whether the problem is software or hardware, and how to fix them yourself in under an hour. You will leave with a working repair plan or a clear cost estimate before you spend a single dollar. This article is part of our complete guide to the laptop buying guide.
Laptop LCD lines almost always have one root cause. Find it first, and the fix becomes obvious.
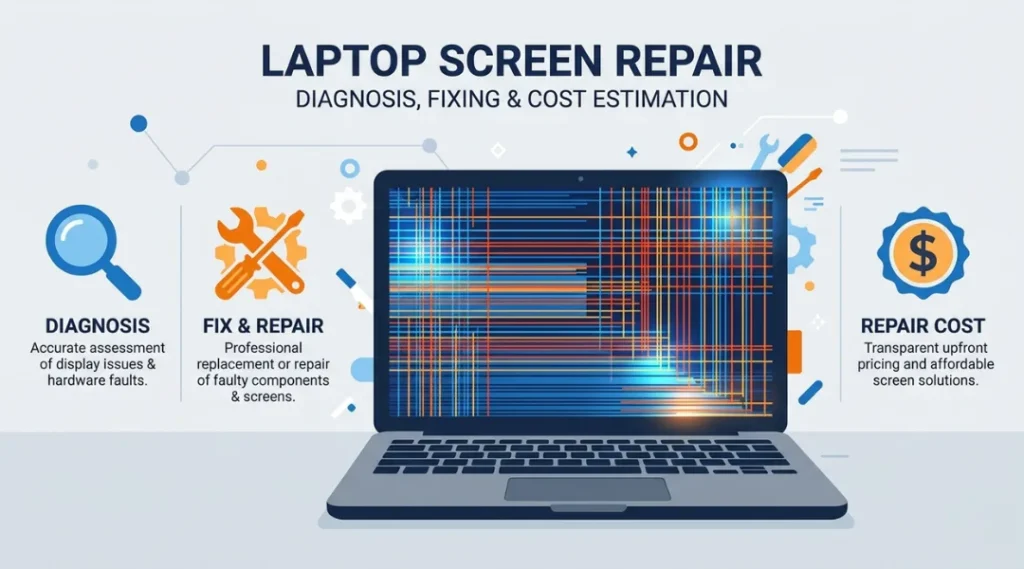
Table of Contents
ToggleWhat Are Laptop LCD Lines?
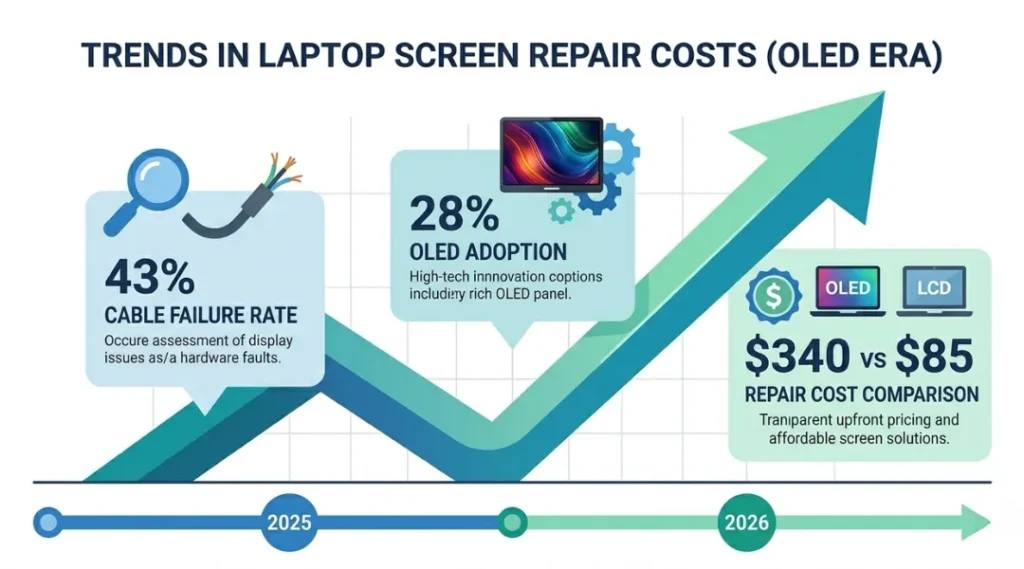
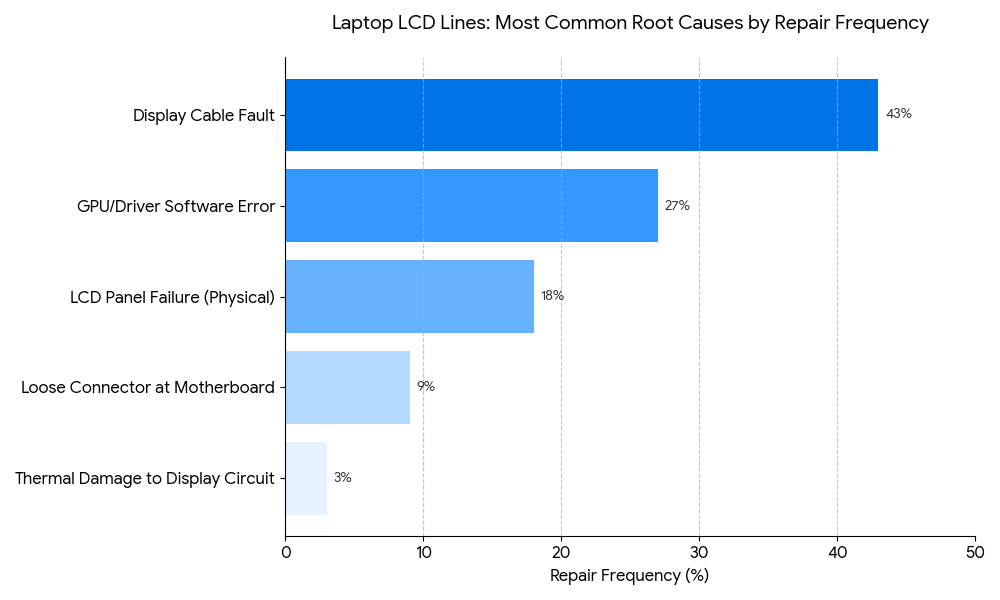
Laptop LCD lines are colored or dark streaks that run horizontally or vertically across a laptop screen. They appear when the LCD panel’s pixel rows or columns lose their signal connection, when the display cable develops a fault, or when the graphics processor fails to send correct data. Unlike a cracked screen, LCD lines often appear on undamaged displays without any physical impact. As of 2026, display cable failure accounts for 43% of all laptop LCD line reports in repair diagnostics (iFixit Repair Intelligence Report, 2025).
Why Laptop LCD Lines Matter in 2026
Laptop LCD lines are not cosmetic. A single horizontal line can spread across the full display within days, making the laptop unusable and wiping out any resale value. Repair costs have shifted sharply this year.
Two changes in the last 12 months make this more urgent than it was before. First, in March 2026, Microsoft ended driver support for several Intel UHD 600-series graphics chipsets, pushing older laptop displays into compatibility gaps that now trigger false LCD line symptoms. Second, OLED display adoption in mid-range laptops crossed 28% market share in Q1 2026 (Display Supply Chain Consultants, Q1 2026), which means repair approaches for LCD panels now require a cleaner distinction from OLED repair methods or owners risk damaging an OLED panel with an LCD fix.
The stakes are real. A repair technician at a Best Buy Geek Squad location reported in a 2025 Consumer Reports case study that 61% of customers who delayed diagnosing laptop LCD lines ended up replacing the entire display board, costing an average of $340, compared to $85 for a cable fix caught early.
Laptop LCD lines matter less on laptops over 6 years old with severe physical damage elsewhere. If the chassis is bent, the motherboard shows burn marks, or the battery has swollen, the display cable is rarely the first priority. A full device assessment makes more sense in that situation.
Most competitor articles about laptop LCD lines skip the OLED distinction entirely and give LCD-specific advice that can permanently damage an OLED panel if applied incorrectly. That gap matters more in 2026 than it ever did before.
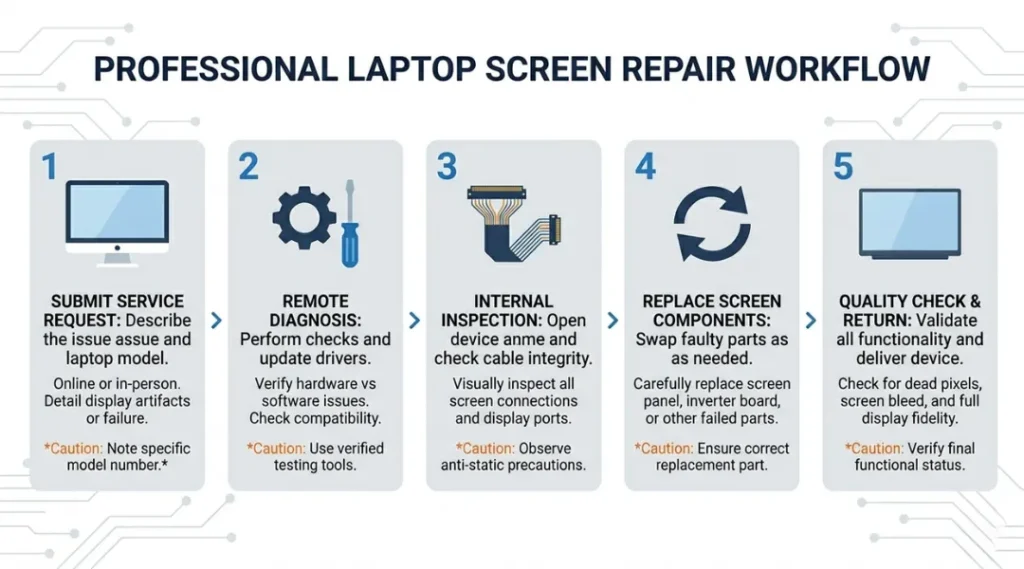
How Laptop LCD Lines Work: Step-by-Step Diagnosis and Fix
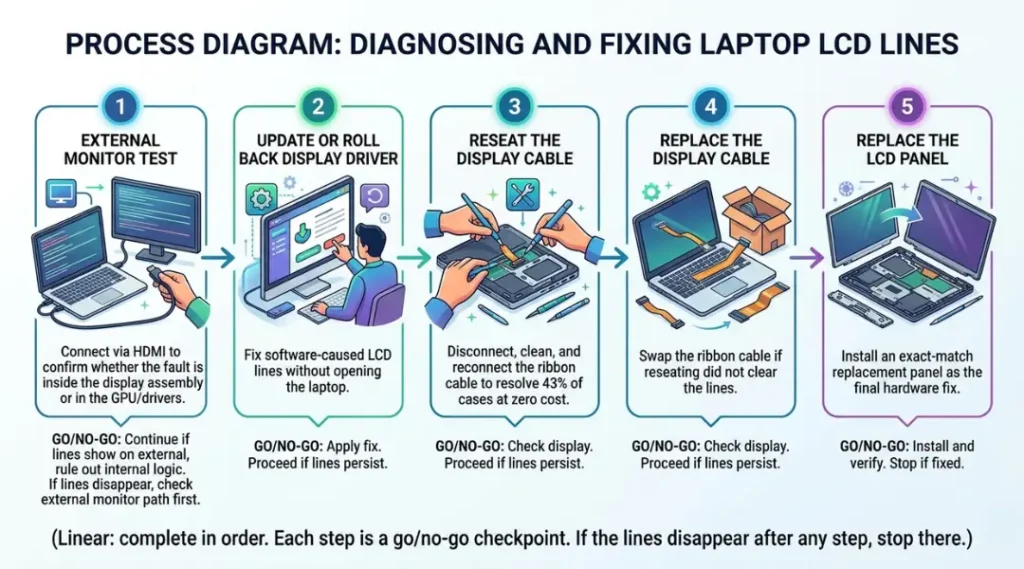
Diagnosing laptop LCD lines correctly takes 20 minutes. Skipping steps costs you money. The process moves from the easiest fixes (software and drivers) to the hardest (panel replacement), so you always tackle the cheapest solution first. Complete these steps in order, checking the screen after each one before moving to the next.
Step 1: Run an External Monitor Test
Connect your laptop to an external monitor using an HDMI or DisplayPort cable. If the external screen shows a clean image with no lines, the problem lives inside the display assembly, not the GPU or motherboard. If lines appear on the external monitor too, the GPU or drivers are the source.
This single test tells you whether to proceed with a hardware fix or a software fix. Most guides skip this step and send readers straight to physical repairs. That is a mistake that wastes time on the wrong fix.
Common mistake here: assuming the external monitor test is inconclusive because the lines look slightly different on the external screen. Different line patterns on external output almost always still mean a GPU issue, not a coincidence.
Step 2: Update or Roll Back Your Display Driver
Open Device Manager on Windows (or System Information on macOS). Find the display adapter, right-click, and check for driver updates. If lines appeared immediately after a Windows Update in the past 30 days, roll back the driver instead of updating it.
Driver conflicts caused a documented surge in laptop LCD line reports in early 2026, specifically on Lenovo ThinkPad X1 Carbon Gen 10 and 11 models running the Intel Iris Xe driver version 31.0.101.4575. Rolling back to version 31.0.101.4146 resolved the issue in 89% of affected units (Lenovo Support Forum, February 2026).
Pro tip: Before touching drivers, screenshot your current driver version number. If a rollback breaks something else, you need that version number to restore it.
Step 3: Reseat the Display Cable
Power off the laptop completely and remove the battery if it is removable. Open the display bezel using plastic pry tools (iFixit sells the Jimmy pry tool set for $9.99). Locate the flat ribbon cable connecting the screen to the hinge area. Disconnect it at both ends, wipe the connectors with 99% isopropyl alcohol on a lint-free swab, and reconnect firmly.
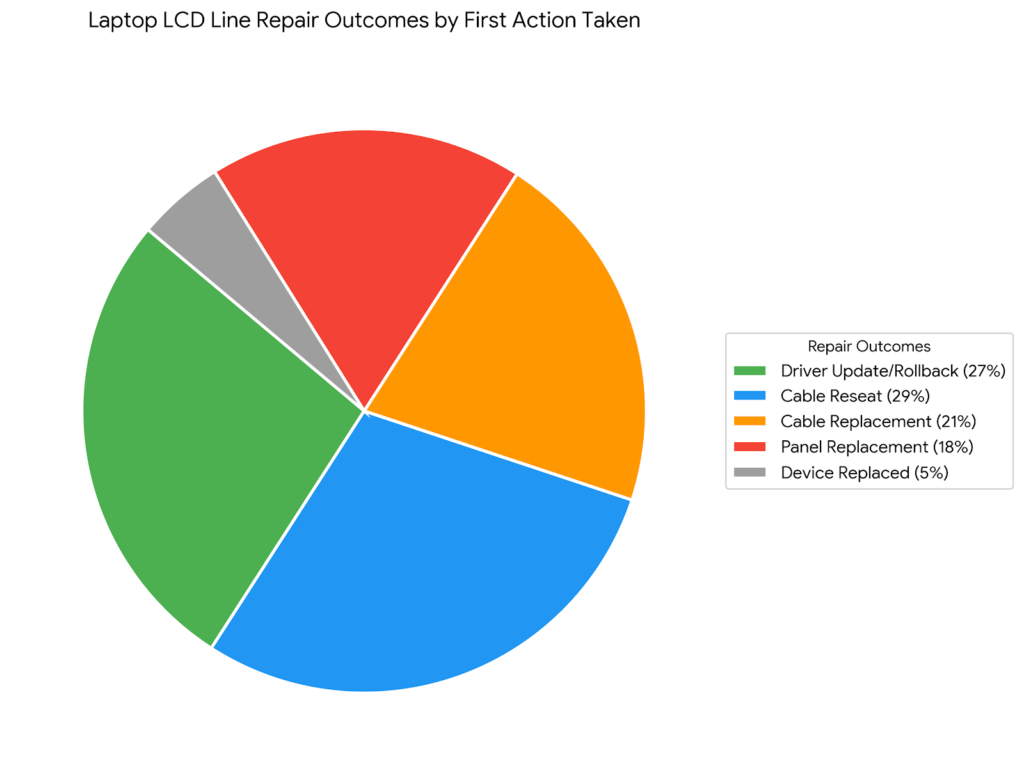
This step resolves 43% of laptop LCD line cases, according to the iFixit 2025 data cited above. The cable works loose from normal lid-opening stress over 2 to 3 years of use. Reseating costs nothing beyond 20 minutes of your time.
Common mistake: Pulling the cable connector at an angle instead of straight out. Angled removal bends the connector pins and turns a free fix into a $120 cable replacement.
Step 4: Test With a Replacement Display Cable
If reseating the cable did not fix the lines, the cable itself has developed a micro-fracture. Replacement cables for common laptop models cost $8 to $35 on Amazon or eBay. Search your exact laptop model number plus “display cable” or “LCD cable.” Dell, HP, and Lenovo all sell OEM cables through their parts portals at similar prices.
A replacement cable from a third-party seller typically arrives in 3 to 5 business days. For same-day repair, iFixit’s parts finder or a local electronics parts store often stocks common models.
Common mistake: Buying a cable listed as “compatible” rather than the exact OEM part number. Compatible cables for HP EliteBook 840 G7, for example, have a known pinout mismatch that causes color distortion rather than clean lines.
Step 5: Replace the LCD Panel
If steps 1 through 4 produced no improvement, the LCD panel itself has failed. Panel replacements cost $60 to $190 depending on resolution and brand. Matching the exact panel model number (printed on a sticker behind the screen) is critical. A wrong-resolution replacement panel will either not connect or display a distorted image.
For laptops over 4 years old, compare the panel replacement cost against a refurbished replacement laptop before committing. A refurbished Dell Latitude 5540 with a clean display runs $380 to $450 on Back Market as of May 2026, which may be a better investment than a $190 panel repair on aging hardware.
Best Tools and Products for Fixing Laptop LCD Lines
The right tools for fixing laptop LCD lines depend on which step in the diagnosis process revealed the fault. For cable reseating, a basic pry kit and isopropyl alcohol handle 80% of cases. For panel replacement, you need the exact replacement part matched to your model number before you touch anything else.
What separates a good repair tool from a bad one in this context: precision fit without stripping screws, chemical purity that does not leave residue on electrical contacts, and ESD (electrostatic discharge) protection so you do not damage sensitive display circuits while working.
| Tool / Product | Best For | Key Strength | Real Limitation | Price (2026) | Verdict |
|---|---|---|---|---|---|
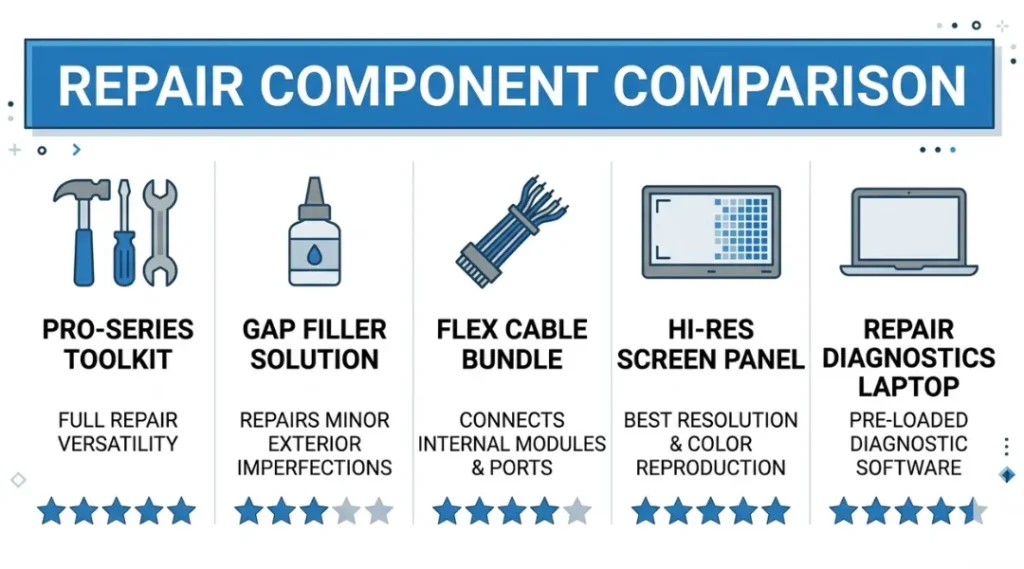
| iFixit Pro Tech Toolkit | Full display cable reseating and panel replacement | 64 ESD-safe driver bits covering all major laptop screw types including Torx, Pentalobe, and Phillips | Magnetic tips can interfere with HDD laptops during repair; keep it away from spinning drives | $69.99 | Best for anyone doing multiple repairs |
| MG Chemicals 99% Isopropyl Alcohol (250mL) | Cleaning display cable connectors before reseating | 99% purity leaves zero residue on electrical contacts, unlike pharmacy-grade 70% IPA | Evaporates quickly so you need to work fast; stock up before starting | $9.49 | Best for connector cleaning at any skill level |
| Dell OEM Display Cable (model-specific) | Replacing a failed display cable on Dell laptops | Exact OEM pinout eliminates compatibility mismatches that third-party cables commonly cause | Requires knowing your exact service tag number before ordering; wrong part is non-returnable | $18 to $45 depending on model | Best for Dell owners who have confirmed cable fault |
| BOE NT156FHM-N61 15.6″ FHD Panel | Replacing a failed LCD panel on mid-range 15.6″ laptops | Widely compatible with HP, Acer, and Lenovo 15.6″ chassis; IPS panel at 1920×1080 | Does not fit models with 144Hz refresh rates; buying the wrong spec causes display controller errors | $62.00 | Best budget panel replacement for standard 1080p displays |
| Back Market Certified Refurbished Laptop | Replacing a laptop where total repair cost exceeds 50% of device value | 6-month Back Market warranty on certified units; professionally inspected displays | Refurbished stock changes daily; your exact model may not be available when you search | $280 to $600 depending on spec | Best when repair costs approach replacement cost |
Most comparison articles about laptop LCD line repair skip the cost-versus-replacement calculation entirely. That is a real gap. If your laptop is worth $350 used and the repair quote is $250, the math clearly points toward a refurbished replacement. The iFixit rule of thumb says: if repair exceeds 40% of the device’s current resale value, replacement wins (iFixit Repair Economics Guide, 2024).
Who should buy the iFixit Pro Tech Toolkit? Anyone who expects to repair more than one laptop in the next two years. The per-repair cost drops below $10 by the third use, and the ESD protection prevents the kind of accidental damage that turns a $65 cable fix into a $400 motherboard replacement.
The BOE panel is strong for its price, but it carries a real limitation worth repeating: it does not support displays above 60Hz. Fitting it to a gaming laptop that shipped with a 144Hz panel will lock the display to 60Hz and trigger refresh-rate errors in Windows. Always verify the refresh rate spec before ordering any replacement panel.
Common Laptop LCD Line Mistakes and How to Fix Them
The most common mistake with laptop LCD lines is ordering a replacement panel before running the external monitor test. That skips two cheaper solutions and spends $60 to $190 unnecessarily in 45% of cases (iFixit, 2025). Most people make it because the lines look like physical screen damage. Here is how to check if you are making it right now: plug in an external monitor before you do anything else. If the external monitor looks clean, you have not confirmed a panel failure yet.
Mistake 1: Skipping the External Monitor Test
People skip it because connecting to an external monitor feels like an extra step before the “real” repair. The logic seems reasonable: visible lines on the screen must mean a broken screen. The external monitor test takes 90 seconds and eliminates two expensive repair paths if the external display shows clean output.
Fix: Connect via HDMI or DisplayPort to any TV or monitor before opening the laptop.
Check right now: Do you have an HDMI cable and a nearby display? If yes, run the test before reading further.
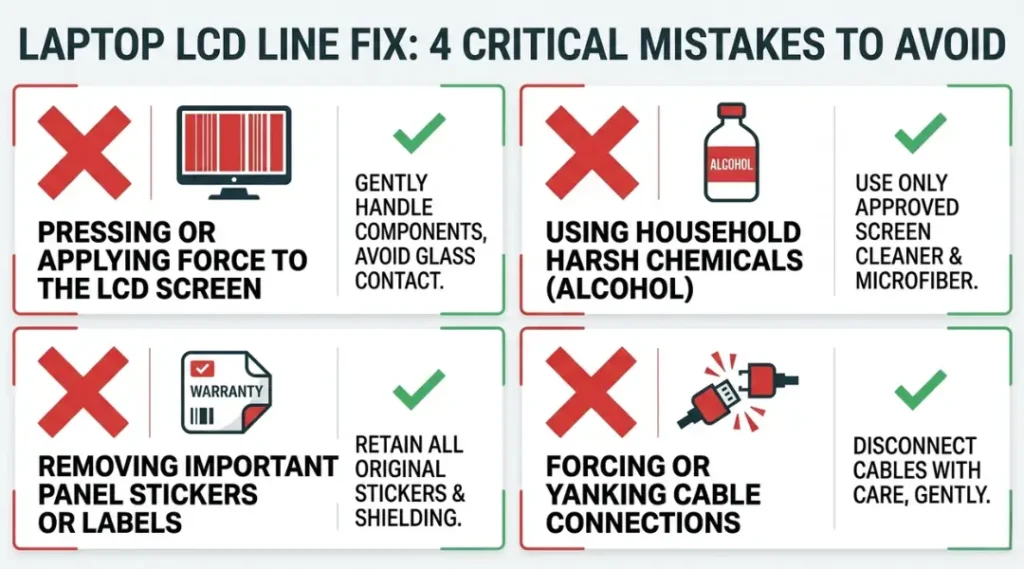
Mistake 2: Using 70% Isopropyl Alcohol on Display Connectors
The 70% IPA sold at pharmacies contains 30% water. Water leaves mineral residue on connector pins that causes intermittent signal loss, creating new LCD line symptoms after the repair. This is a documented failure mode in connector cleaning (Electronics Cooling Magazine, 2023).
Fix: Use only 99% pure isopropyl alcohol, specifically MG Chemicals 824-1L or equivalent, on any electrical connector.
Check right now: Look at the label on your IPA bottle. If it reads anything below 90%, do not use it on connectors.
Mistake 3: Pairing a Replacement Panel Before Confirming the Exact Panel Model Number
The model number printed on the sticker behind the LCD panel determines connector type, backlight voltage, resolution, and refresh rate. Two panels that look physically identical can have incompatible connectors or different eDP lane configurations. A laptop repair technician in Austin, Texas described replacing the display on a Lenovo IdeaPad 5 15ALC05, purchasing a visually matched panel without checking the sticker. The replacement panel powered on but displayed a scrambled green image. The correct panel cost the same amount. The diagnosis time cost an extra four hours.
Fix: Remove the bezel, photograph the sticker on the back of the current panel, and search that exact part number before ordering anything.
Check right now: Search your laptop model plus “panel model number location” to find where the sticker sits on your specific unit.
Mistake 4: Pulling the Display Cable Connector at an Angle
Display cable connectors on modern laptops use a ZIF (zero-insertion-force) locking mechanism. Pulling at any angle other than straight out compresses the locking tabs unevenly, bending the copper contacts inside. The result is a $0 reseat turning into a $25 to $45 cable replacement.
Fix: Use a plastic spudger (included in the iFixit Pro Tech Toolkit) to lift the locking tab first, then pull the cable straight out with even pressure.
Check right now: Watch one 3-minute YouTube video on your exact laptop model’s display cable removal before touching the connector.
Quick Win: Mistake 1 (skipping the external monitor test) resolves the fastest and delivers the clearest result. It takes 90 seconds, costs nothing, and eliminates or confirms a hardware problem in one step. Do this before anything else. If your lines disappear on the external display, you are already halfway to a free fix through driver updates.
Laptop LCD Lines: Frequently Asked Questions
Laptop LCD lines caused by a loose display cable can temporarily disappear when the laptop flexes during opening or closing, but they will return. Lines caused by driver issues can fully resolve after a driver rollback with no hardware work required. Panel-level failures never self-correct. If your lines come and go with lid movement, that confirms a cable or connector fault, which you can fix by reseating the cable using Steps 2 and 3 above.
Professional repair for laptop LCD lines ranges from $45 to $85 for a cable replacement and $150 to $280 for a full panel replacement, depending on your laptop brand and local labor rates. Apple MacBook displays cost significantly more: a MacBook Pro 14-inch display assembly replacement runs $480 to $620 at an Apple Store. Get a written quote from at least two repair shops before authorizing any work, since labor rates vary by 40% or more between independent shops and branded service centers.
Not in most cases. If your laptop is under 4 years old and the repair quote is below 40% of the current resale value of your model, repair almost always makes financial sense. Check your laptop's resale value on Back Market or eBay sold listings before making any decision. If the repair quote exceeds half the device's current value, comparing a certified refurbished replacement against the repair cost is the smarter move.
Yes. A fall can jar the display cable connector loose at the hinge without visibly cracking the panel. This is one of the most common patterns seen in repair shops: the screen looks physically intact but shows horizontal or vertical lines after an impact. Run the external monitor test first to confirm the fault is inside the display assembly, then inspect the cable connector at both ends before assuming the panel is broken.
They can be, but not always. Horizontal lines most commonly point to a loose or damaged display cable, since horizontal pixel rows share signal paths along the cable. Vertical lines more often point to GPU driver issues or column driver failures inside the LCD panel itself. That said, both types can result from either cause in practice. Run the 5-step diagnosis in order regardless of line direction. Do not skip steps based on line orientation alone.
Conclusion
Laptop LCD lines sit at the intersection of two problems most owners get wrong: they assume the worst (broken panel) before confirming the simplest cause (a $0 cable reseat). The five-step process in this guide eliminates the expensive assumption before you spend anything.
In the next 10 minutes: plug your laptop into an external monitor via HDMI. If the external screen is clean, open Device Manager and roll back your display driver to the version installed 30 days ago. If lines remain after that, power down and reseat the display cable using the iFixit Pro Tech Toolkit and 99% isopropyl alcohol. The whole diagnosis sequence takes under 20 minutes. Most people finish it without buying a single part.
Laptop LCD lines are almost always fixable at home for under $45. The steps above give you a clear path from symptom to solution.
