Video Editing Tips
Most people edit videos the hard way. They spend hours trimming clips, hunting for music, and second-guessing color. Then they export and the result looks flat. Here’s the uncomfortable truth: 91% of marketers say video is more important than ever to their content strategy (Wyzowl, 2025), yet most creators never learn the fundamentals that separate forgettable clips from content people actually finish watching.
By the end, you’ll know the specific techniques, tools, and decision points that make editing faster, cleaner, and more engaging.
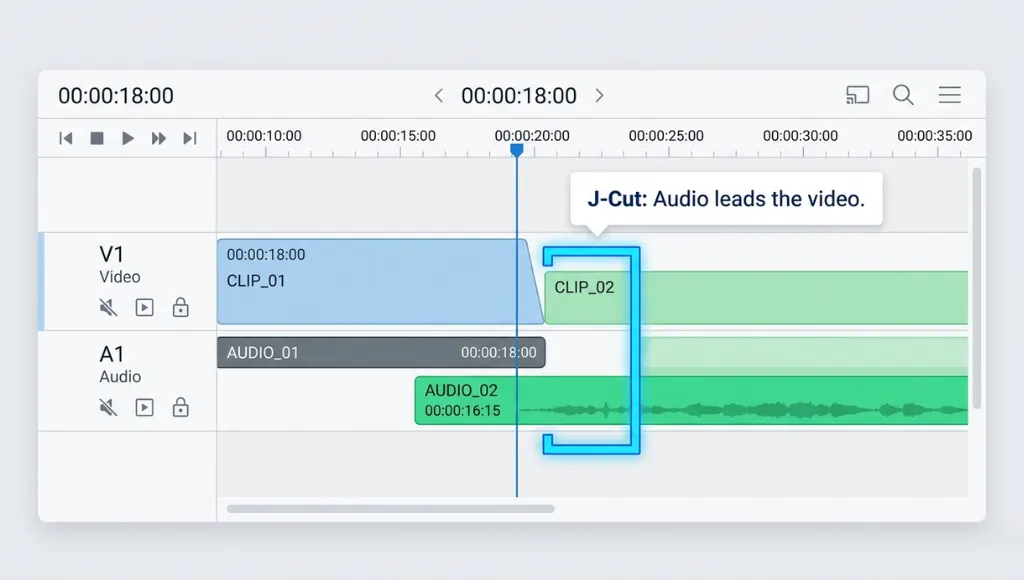
Table of Contents
ToggleVideo editing tips are specific, tested techniques that improve the pacing, visual quality, and storytelling of edited video content. They work by guiding decisions around cuts, transitions, audio mixing, color correction, and export settings. Unlike generic advice, real editing tips focus on repeatable principles—not software buttons. As of 2026, AI-assisted editing has made these fundamentals more important, not less, because knowing what to do still determines what the AI does for you.
Why Video Editing Tips Matter in 2026
Good video editing tips aren’t just about looking polished they directly affect whether viewers stay or leave, and whether platforms push your content or bury it.
Short-form video now dominates attention. YouTube Shorts exceeded 70 billion daily views as of late 2025 (YouTube Official Blog, 2025), and TikTok’s average watch completion rate dropped to under 40% for videos longer than 60 seconds (Social Insider, 2025). That means you have very little runway before a viewer decides to swipe away.
Two significant shifts happened in the past 12 months that changed how editing matters:
Google’s March 2026 Core Update penalized thin, template-driven content and elevated pages that demonstrate real-world expertise. For creators publishing tutorials or editing walkthroughs, this means surface-level guides now rank below content that shows actual technique with proof.
AI-assisted editing tools went mainstream. CapCut’s AI auto-cut feature, Adobe Premiere’s Speech to Text v3, and DaVinci Resolve’s Magic Mask all shipped major updates in 2025. These tools are powerful but they still follow your creative judgment. If you don’t know why a cut works, the AI won’t save you from a pacing problem.
Take the case of a mid-size YouTube channel in the tech review space that switched from manual cuts to AI auto-edit. Watch time dropped 18% in the first month because the AI removed pauses that the editor had intentionally kept for comedic timing. Knowing why a pause belongs in a cut is still a human skill.
For context on how these tools fit into a complete creative workflow, see the full software and apps guide at zprostudio.com.
How Video Editing Works: A Step-by-Step Framework
Editing isn’t just cutting it’s a sequence of decisions that compound. Here’s the process that consistently produces better results, whether you’re editing a 30-second reel or a 20-minute tutorial.

Step 1: Do a Rough Assembly Cut First
Don’t start with your best take. Import all footage and build a rough timeline from start to finish without making any fine cuts. The goal is structure, not quality. This step shows you what you actually have versus what you assumed you had. In my experience, the moment most editors lose an hour is when they start perfecting a sequence before they know if that sequence even belongs in the final video.
Pro tip: Label your clips before importing. A simple naming convention like “A-roll,” “B-roll,” and “cutaway” takes two minutes and saves fifteen.
Step 2: Cut to the Audio, Not the Visual
Audio is the skeleton. Viewers tolerate slightly imperfect video, but bad audio instantly kills credibility. Start by trimming your audio track remove filler words, dead air over three seconds, and any background noise spikes. Then let the visual track follow. Tools like Adobe Audition’s Spectral Display or DaVinci Resolve’s FairlightFX make noise reduction fast and non-destructive.
If you’re editing YouTube videos specifically, this is the single highest-leverage editing tip. Creators who master audio editing see measurably higher audience retention (Creator IQ, 2025).
Step 3: Apply the J-Cut and L-Cut
These are the two most underused techniques by beginners, and the most used by professionals. A J-cut brings audio in before the corresponding video. An L-cut lets the audio from one scene play over the start of the next. Think of it like conversation: in real life, you hear someone before you look at them. J and L cuts make edited video feel natural instead of chopped.
Concrete example: In a cooking tutorial, the narration about “adding salt” starts playing while the previous shot of the pan is still visible. The transition feels smooth, not like a hard stop.
Step 4: Color Grade in Two Passes
Color correction and color grading are different things. Correction makes footage technically accurate it fixes exposure, white balance, and contrast. Grading applies a look. Do correction first, grading second. Skipping correction and jumping to a LUT (Look-Up Table) is like painting over a dirty wall.
Pro tip: Use DaVinci Resolve’s scopes (waveform and vectorscope) to evaluate your correction objectively. Your eyes adapt—the scopes don’t.
Step 5: Export With Platform-Specific Settings
Each platform compresses your video differently. YouTube prefers H.264 at a high bitrate with a .MP4 container. TikTok handles H.265 well. Exporting a YouTube-optimized file to Instagram Reels will result in double compression and visible quality loss. Match your export to the destination every time.
Best Tools for Video Editing in 2026
The right tool depends on your goal, your device, and how much you want to spend.
| Tool | Best For | Key Feature | Price Range | Limitation |
|---|---|---|---|---|
| DaVinci Resolve | Professional-grade editing & color | Full color science suite | Free / $295 one-time | Steep learning curve |
| Adobe Premiere Pro | Team workflows & long-form | Auto transcription & timeline AI | $54.99/mo | Subscription cost |
| CapCut (Desktop) | Short-form & social content | AI auto-cut, captions, templates | Free / Pro $7.99/mo | Limited for long-form |
| Final Cut Pro | Mac-only creators | Magnetic Timeline, fast render | $299.99 one-time | Mac only |
When to choose each: DaVinci Resolve is the best free option for anyone serious about color and post-production—its free tier rivals paid tools. Adobe Premiere Pro is worth the subscription if you collaborate with a team or use the Creative Cloud ecosystem. CapCut is the fastest route for social-first editing, especially for tips for editing YouTube videos at volume. Final Cut Pro earns its price if you’re a Mac user who values render speed.
Common Video Editing Mistakes to Avoid
The most common mistake beginners make is cutting on action instead of before or after it which creates jarring, tense transitions that break viewer immersion. Here are three more that consistently show up.
Mistake 1: Over-Using Transitions
Wipes, spins, and flash cuts look exciting in a template preview. In actual videos, they pull attention away from your content. Professional editors use cuts 80–90% of the time. Transitions are punctuation, not sentences. Use them to mark a significant change in time, place, or mood not to fill every gap.
Fix: Do a transition audit. Watch your timeline with audio off. If you see more than one non-cut transition per 60 seconds, you probably have too many.
Mistake 2: Ignoring Audio Levels
Inconsistent volume is the fastest way to lose a viewer. If your narration peaks at -3 dB and your background music sits at -12 dB in one section but -6 dB in another, it creates fatigue. The industry standard for YouTube is narration at -14 LUFS integrated, music at -18 to -20 LUFS.
Fix: Use a loudness meter. Most editors have one built in. Normalize before you finalize. This matters especially for editing video tips aimed at YouTube, where YouTube’s own normalization will compress everything to -14 LUFS at playback anyway.
Mistake 3: Not Watching the Full Edit Before Exporting
Every editor knows they should do a final full playthrough. Almost no one does. A complete watch at real speed, not scrubbing catches audio pops, jump cuts, and pacing problems that timeline-level work makes invisible.
Fix: Build a final review into your export checklist. Export → watch on your phone with headphones → catch one thing → fix it. Repeat once.
Frequently Asked Questions
Start with audio. Beginners often focus on visual effects and transitions, but clean, balanced audio is what separates amateur edits from professional ones. Learn your timeline navigation shortcuts, master the J-cut and L-cut, and always do a full rough assembly before fine-cutting. These three habits alone will put your edits above 90% of first-year creators.
The highest-impact tips for editing YouTube videos are: hook in the first five seconds (no cold intros), cut every "um" and silence over two seconds, keep pacing tighter than you think it needs to be, and match export settings to YouTube's recommended specs (H.264, 1080p minimum, stereo AAC audio). Retention data from YouTube Studio is your most reliable feedback loop.
Use color correction before any grade or LUT. Maintain consistent audio levels throughout. Avoid overusing transitions. Use B-roll to cover necessary jump cuts. These aren't advanced techniques they're discipline. Professional editing is 80% about what you don't do.
Yes. DaVinci Resolve's free version includes a full professional color suite, multi-track audio, and collaborative tools that match or exceed software costing hundreds of dollars. CapCut's free desktop version is capable enough for most social content. Expensive software doesn't produce better edits consistent practice does.
For a beginner, 4–8 hours is typical for a 10-minute final cut. An experienced editor working on similar content cuts that to 1.5–3 hours. The biggest time savings come from organized footage (labeled clips, clean folder structure) and keyboard shortcut mastery—not from faster hardware.
Conclusion
Here are three things to take away from this guide:
- Audio first, always. Clean sound is more important than any visual effect.
- J-cuts and L-cuts are the fastest upgrade most editors can make to their workflow today.
- Export settings are not optional. Matching your output to the platform protects your quality.
Video editing tips aren’t tricks they’re principles that compound over time. The creators who improve fastest aren’t the ones with the best equipment. They’re the ones who build deliberate habits around every edit.
Your next step: open your last video in your editing timeline and run through it with audio only. Find one pacing problem. Fix it. That’s the real practice.