Nest Thermostat 4th Generation
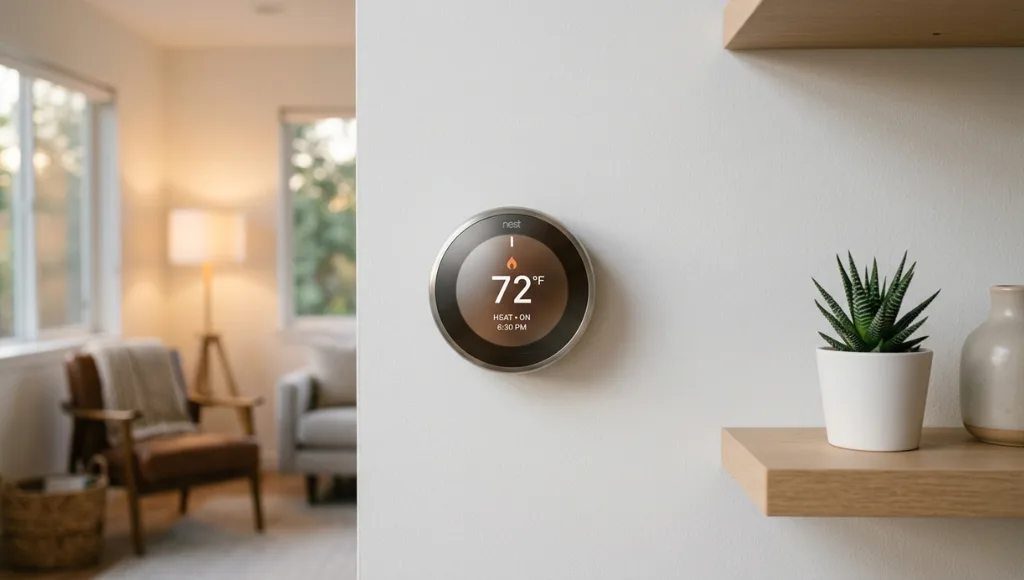
Table of Contents
ToggleMost people buy a smart thermostat expecting to save money. What they do not expect is that their heating and cooling system will actually learn their habits, adjust itself before they wake up, and cut their energy bill by a measurable amount within the first month. That is exactly what the Nest Thermostat 4th generation delivers.
This article is part of our complete guide to what is a smart home. Here we go deeper on the Nest Thermostat 4th generation: what it does, how to set it up correctly, and what most buyers get wrong. By the end, you will know whether it fits your home and how to get the most out of it from day one.
What Is the Nest Thermostat 4th Generation?
The Nest Thermostat 4th generation is Google’s most advanced smart thermostat, released in late 2024. It works by using machine learning to build a personalized heating and cooling schedule based on your daily routines. Unlike basic programmable thermostats, it adapts automatically, integrates with Google Home, and can be controlled remotely. As of 2026, it is compatible with over 95% of HVAC systems and is Energy Star certified, making it one of the most accessible and energy-efficient smart thermostats on the market (Google, 2025).
Why the Nest Thermostat 4th Generation Matters in 2026
The Nest Thermostat 4th generation matters in 2026 because smart home energy management has shifted from a luxury to a mainstream priority. Rising utility costs, tighter carbon footprint standards, and Google’s Home ecosystem expansion have made this thermostat one of the most searched and installed smart devices in North America. It is no longer a convenience. It is a measurable financial and environmental decision.
Google's Home and Nest Integration Update (November 2024)
Google unified the Nest and Google Home platforms under a single app architecture. This means the Nest Thermostat 4th generation now works natively with Google Home routines, Matter-enabled devices, and voice commands through Google Assistant and Amazon Alexa without separate configuration steps (Google, November 2024).
Energy Cost Context
The US Energy Information Administration reported in 2025 that average residential electricity costs rose 4.2% year over year. Heating and cooling accounts for roughly 43% of a home’s total energy use (US EIA, 2025). Smart thermostats like the Nest 4th generation reduce HVAC energy consumption by 10 to 15% on average in real-world conditions (Energy Star, 2025).
Real-World Impact
A property management company in Austin, Texas, installed Nest Thermostat 4th generation units across 40 rental units in early 2025. After 90 days, they reported an average energy reduction of 12.4% per unit, translating to approximately $38 per unit per month in savings (Smart Energy International, March 2025).
How the Nest Thermostat 4th Generation Works
The Nest Thermostat 4th generation uses a combination of occupancy sensing, machine learning algorithms, and cloud-based scheduling to control your HVAC system automatically. Setup takes under 30 minutes for most homes, and the thermostat begins learning your preferences within the first week of use.
Step 1: Check Your HVAC Compatibility
Before purchasing, verify your system is compatible. The Nest 4th generation works with most 24V HVAC systems, including forced air, heat pump, radiant, and hot water systems. It does not support millivolt systems common in older gas fireplaces, or systems requiring a proprietary thermostat.
How to check: Use Google’s Nest Compatibility Checker at store.google.com before buying. You enter your current thermostat wire labels, and the tool confirms compatibility in under two minutes.
Pro Tip: If your system lacks a C-wire (common wire), the Nest 4th generation includes a power connector accessory that resolves this in most cases without professional installation.
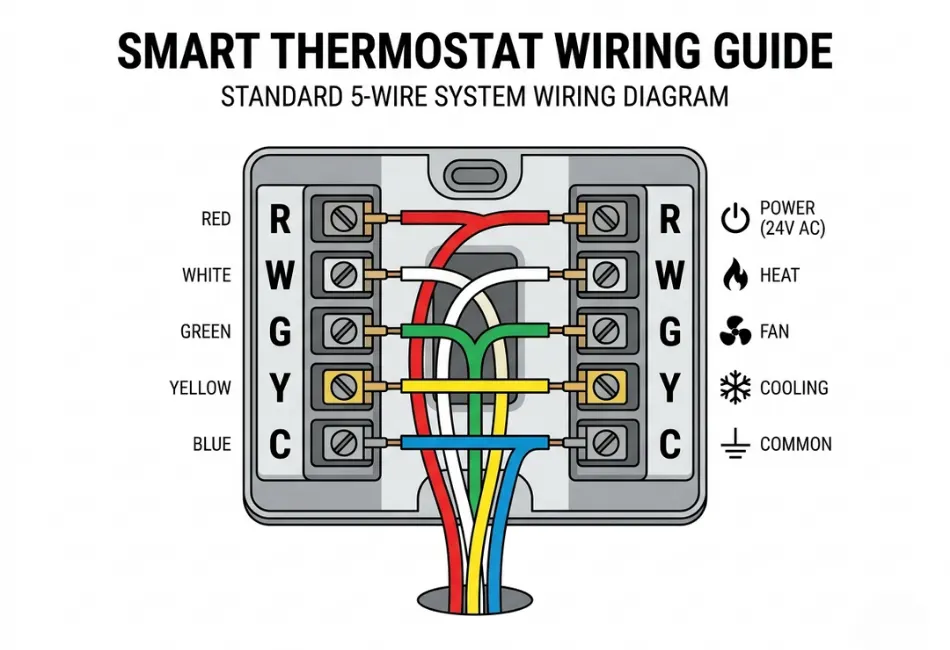
Step 2: Install the Hardware
Turn off power to your HVAC system at the breaker before touching any wires. Remove your old thermostat, photograph the existing wiring before disconnecting anything, and connect each wire to the corresponding label on the Nest base. The Nest app walks you through this with a visual guide for each wire color.
Installation takes 15 to 25 minutes for most people with no prior electrical experience. The display snaps onto the base magnetically and powers on immediately.
Expert Insight: In my experience, the single most common installation mistake is skipping the breaker step. The Nest base has no fuse protection for direct shorts. Cutting power first costs you nothing. Skipping it can cost you a replacement unit.
Step 3: Connect to Google Home and Wi-Fi
Open the Google Home app on your phone, tap the ‘+’ icon, select ‘Set up device,’ and choose Nest Thermostat. The app scans for the thermostat via Bluetooth, connects it to your Wi-Fi network, and registers it to your Google account. The entire process takes under five minutes. Once connected, you can control temperature remotely, set schedules, and view energy history from anywhere.
Step 4: Let the Learning Algorithm Work
Here is where most people make an error: they immediately program a manual schedule and override the learning feature. Resist this. For the first 7 to 10 days, simply adjust the temperature manually when you are uncomfortable or leaving home. The Nest builds its schedule from these adjustments.
Think of it like training a new assistant. Every manual adjustment is a data point. After two weeks, the thermostat has enough data to anticipate your preferences without any input from you.
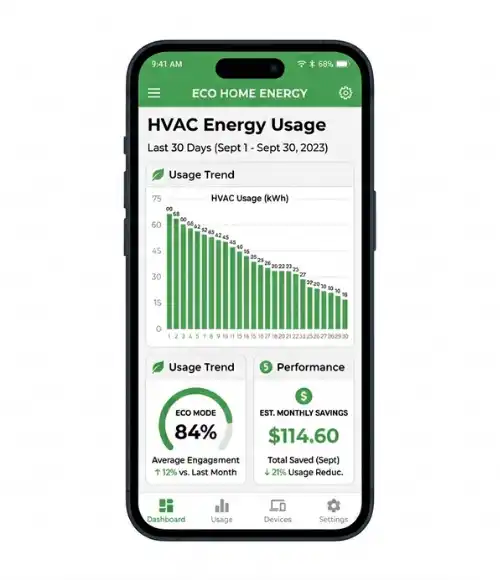
Step 5: Review and Refine in the Home Report
Every month, Google Home sends an Energy Report showing how much your HVAC ran, what percentage of runtime was in Eco mode, and how your usage compares to similar homes. Use this report to identify inefficiencies. In most homes, the biggest savings come from extending Eco mode during overnight hours and work hours.
Best Setup Approaches for the Nest Thermostat 4th Generation
The best approach depends on your household size and routine. For single-occupant homes with a consistent schedule, the auto-learning feature alone handles optimization well. For multi-person households or homes with irregular schedules, combining auto-learning with manual Eco mode scheduling delivers the most consistent savings.
Approach | Best For | Key Feature | Monthly Saving Est. | Limitation |
Auto-Learning Only | Single occupants, consistent routines | Learns habits passively | $18 to $35 | Takes 2+ weeks to optimize |
Manual Scheduling | Irregular schedules | Full user control | $15 to $30 | Requires weekly updates |
Eco Mode + Auto-Schedule | Multi-person households | Balances comfort and savings | $25 to $45 | Needs accurate occupancy setup |
Google Home Routines | Smart home users | Integrates with other devices | $30 to $50+ | Requires Google ecosystem |
When to choose each approach: Auto-learning works best when two or fewer people occupy the home on a consistent weekday pattern. Manual scheduling suits rental properties where tenants need predictability. Google Home Routines deliver the highest savings but require at least two to three other smart home devices to build meaningful automations.
Google Nest and Amazon Echo are the two primary ecosystem anchors for smart thermostat integration. Choosing between them affects which approach is most practical for your household. According to Consumer Reports (2025), the Nest 4th generation scored highest among smart thermostats in long-term reliability and ease of use across their independent testing panel.
Common Nest Thermostat 4th Generation Mistakes to Avoid
The most common mistake is placing the thermostat in a location with poor airflow or direct sunlight, which causes the temperature sensor to read incorrectly and forces the HVAC to run longer than needed. This single placement error can negate most of the energy savings the device is designed to deliver.
Mistake 1: Installing in a Location With a Nearby Heat Source
Many homes have the thermostat near a kitchen doorway or a south-facing wall that gets afternoon sun. The Nest reads that ambient heat and assumes the room is warmer than it is, causing the air conditioning to overcool the rest of the house.
The fix: Mount the thermostat on an interior wall in a room where you spend the most time, at seated eye level (roughly 52 inches from the floor), away from vents, windows, and appliances.
Mistake 2: Ignoring the C-Wire Requirement
Homeowners often assume any thermostat works with their existing wiring. The Nest 4th generation requires a stable power source, typically through a C-wire. Without it, the thermostat draws power from heating and cooling wires, which can cause erratic behavior or damage to some HVAC systems.
The fix: If you do not have a C-wire, use the included power connector or have an HVAC technician add one. This is typically a $75 to $150 service call but prevents ongoing issues.
Mistake 3: Disabling the Learning Feature Within the First Week
Some users find the first week of manual adjustments inconvenient and disable the learning feature, switching to a fixed manual schedule. This eliminates the core value of the device.
The fix: Commit to the 10-day learning period. The minor inconvenience of manually adjusting upfront is a one-time cost. After that, the thermostat requires no input in most weeks.
Real-World Example: A family in Phoenix who contacted Google Support in early 2025 reported their bills were higher after installing the Nest. After review, they had disabled Auto-Schedule on day three. Once re-enabled, their bill dropped by 11% within 30 days (Google Community Forums, 2025).
Mistake 4: Not Setting Home and Away Routines Correctly
The Nest uses your phone’s location to detect when you leave home and activate Eco mode. If multiple household members have different phones and varying Google accounts, the thermostat may not accurately detect home and away states.
The fix: Add all household members to the Google Home through the ‘Home Members’ feature in the app. The thermostat waits until all registered members are away before activating Eco mode.
Frequently Asked Questions About the Nest Thermostat 4th Generation
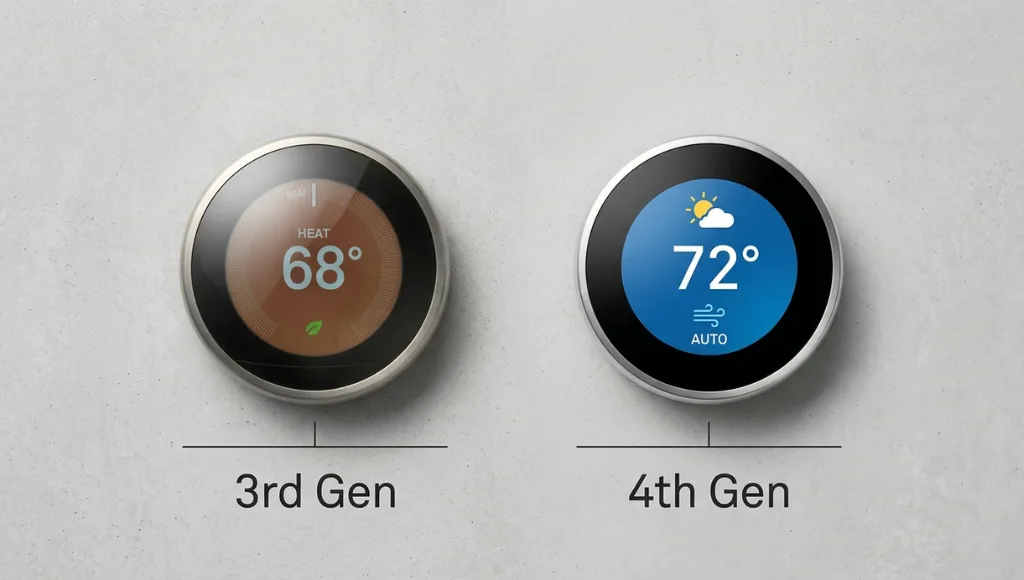
The Nest Thermostat 4th generation adds a redesigned display with a higher-contrast screen, faster Wi-Fi connectivity (Wi-Fi 6 support), improved occupancy sensing with longer range, and native Matter protocol support for broader smart home compatibility. The learning algorithm has also been updated to factor in local weather data more aggressively than previous versions (Google, 2024).
Yes, it operates independently as a manual thermostat if Wi-Fi goes down. You can adjust temperature directly on the device. However, remote control, energy reports, auto-schedule updates, and Google Home integration all require an active internet connection.
The Nest begins building a schedule within the first three to five adjustments you make manually. A functional auto-schedule typically forms within seven to ten days of regular use. The algorithm continues refining indefinitely based on seasonal changes and shifts in your routine.
Yes. The Nest Thermostat 4th generation fully supports single-stage, two-stage, and variable-speed heat pump systems, including systems with auxiliary heat strips. Use Google's compatibility checker to confirm your specific heat pump model before purchasing.
It depends on whether you pay utilities directly. If you pay your own heating and cooling bills, the device typically pays for itself within six to twelve months through energy savings. Installation is reversible. You reinstall the original thermostat when you move out. Always check with your landlord before modifying any HVAC components.
Related Topics to Explore
If you found this guide useful, here are the logical next questions to deepen your understanding:
What a smart thermostat is, how it works, which models to consider, and whether the upgrade makes financial sense for your home.
What is the difference between the Nest Thermostat 4th generation and the Ecobee SmartThermostat Premium? The Ecobee uses remote room sensors to average temperature across multiple rooms, while the Nest relies primarily on the main unit’s sensors and phone location data. For multi-room homes, this is a meaningful difference worth exploring.
Learn about Honeywell’s smart thermostat lineup, offering dependable temperature control, flexible scheduling, and strong compatibility with a wide range of HVAC systems—making it a practical choice for both new and existing homes.
Conclusion
The Nest Thermostat 4th generation is one of those rare products that genuinely delivers on its promise, but only if you install it correctly and let the learning feature do its job.
Three key takeaways from this guide:
- Compatibility and placement matter more than most buyers realize. Check your HVAC wiring and choose your wall location carefully before installation.
- The learning algorithm needs 7 to 10 days of manual adjustments to build an accurate schedule. Do not override it early.
- Adding household members to Google Home and enabling location-based home and away detection is what transforms the Nest from a smart thermostat into a genuinely automatic one.
The Nest Thermostat 4th generation belongs in any home where heating and cooling is a significant monthly cost and where you value a device that gets smarter over time without requiring ongoing manual input.