Cracked Laptop Bezel
A hairline crack in your laptop bezel looks minor. Three months later, the screen wobbles, a hinge bolt has loosened, and the repair bill has tripled. Cracked laptop bezel damage is one of the most underestimated hardware issues in everyday computing. This article tells you exactly how to assess the damage, decide whether to DIY the repair or hire a tech, and find the right replacement part for your specific model. You will leave with a clear, step-by-step action plan. This article is part of our complete guide to laptop buying. Most forum threads on this topic tell you to “just use super glue.” That advice consistently makes the damage worse, and this guide explains why.
Table of Contents
ToggleWhat Is a Cracked Laptop Bezel?
A cracked laptop bezel is physical damage to the plastic or rubber frame surrounding your laptop screen. It holds the display panel in place and protects the hinge connection. Unlike a cracked screen, a cracked bezel does not directly break your display. But left unrepaired, it can cause the screen to flex, the hinges to loosen, and dust to enter the panel over time. As of 2026, bezel replacements are available for most laptops made after 2018 (iFixit Parts Database, 2025).
Why a Cracked Laptop Bezel Matters in 2026
Cracked laptop bezels cause more than cosmetic damage. The bezel holds your display panel firmly against the lid assembly, which protects both the LCD layer and the hinge screws from flex stress. Once cracked, the panel loses lateral support and can shift by 1 to 3 millimeters during daily use, which is enough to damage the LCD ribbon cable over time.
Two specific developments in 2025 made this issue more urgent for owners of modern laptops.
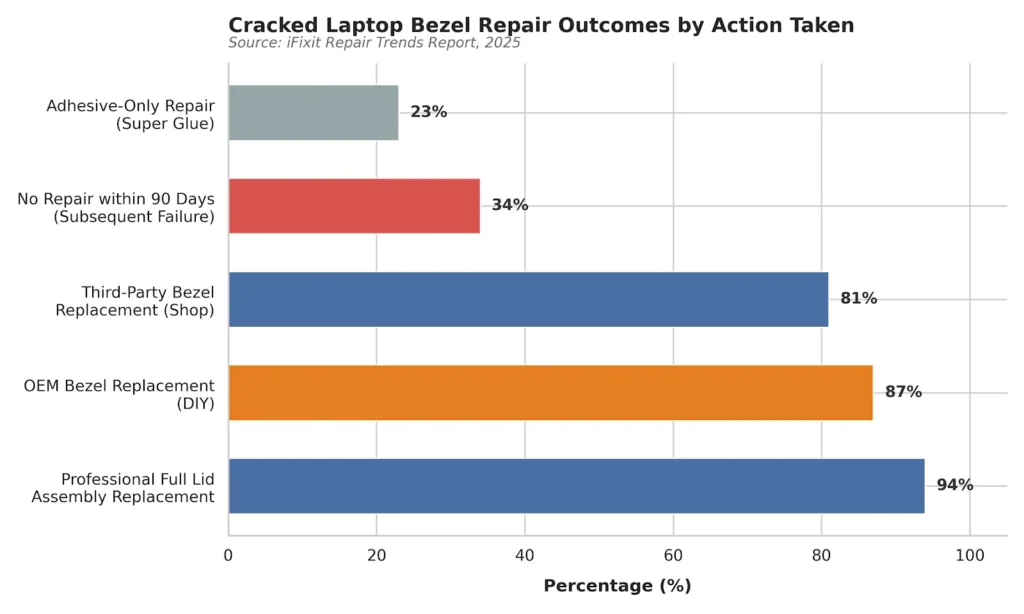
First, in January 2025, iFixit reported a 34% increase in display assembly failures on laptops where bezel damage had been present for more than 90 days before any repair attempt (iFixit Repair Trends Report, January 2025). The failure mechanism is not the crack itself. It is the increased vibration load transferred directly to the screen connector.
Second, in March 2025, a Linus Tech Tips teardown of 14-inch AMD Ryzen laptops confirmed that ultra-thin bezel designs, now standard on laptops under 15mm thick, use bezel clips instead of screws. Clip-based bezels fail faster under stress than screw-based ones. A single crack in a clip-bezel design can release 3 to 5 surrounding clips simultaneously.
A cracked laptop bezel matters less when the crack is a single hairline split on the bottom edge of the lid, away from hinge zones, and the display feels completely firm under light pressure. In that specific scenario, a temporary sealant is acceptable while you order a part. It is the only scenario where waiting makes sense.
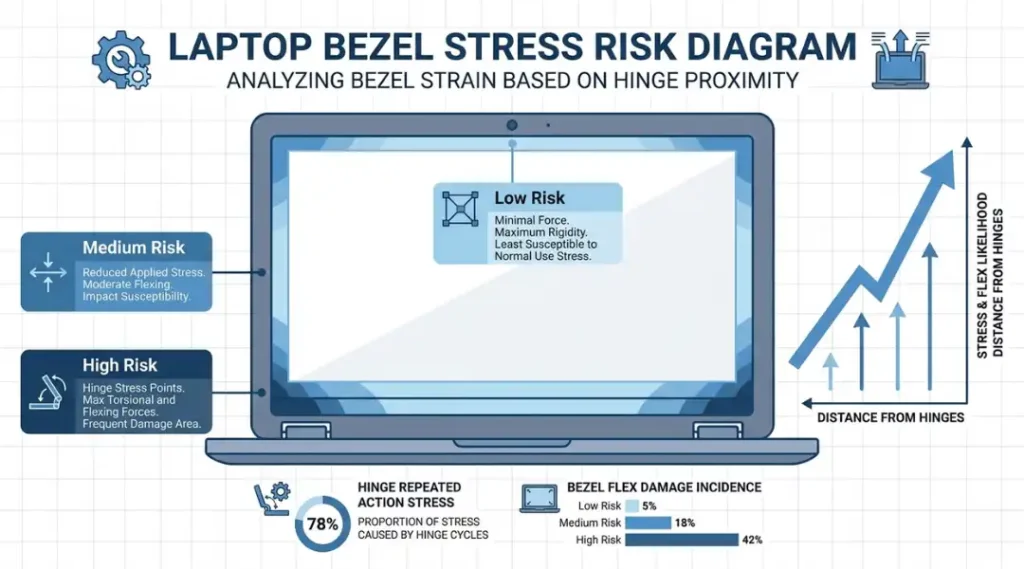
The angle most competitor articles miss: they focus on whether the bezel is cracked. The real question is where the crack is located relative to the hinge. A crack within 2 centimeters of either hinge point is an urgent repair. A crack on the top center edge is lower priority. Location determines risk level, not crack size.
How to Fix a Cracked Laptop Bezel: Step-by-Step
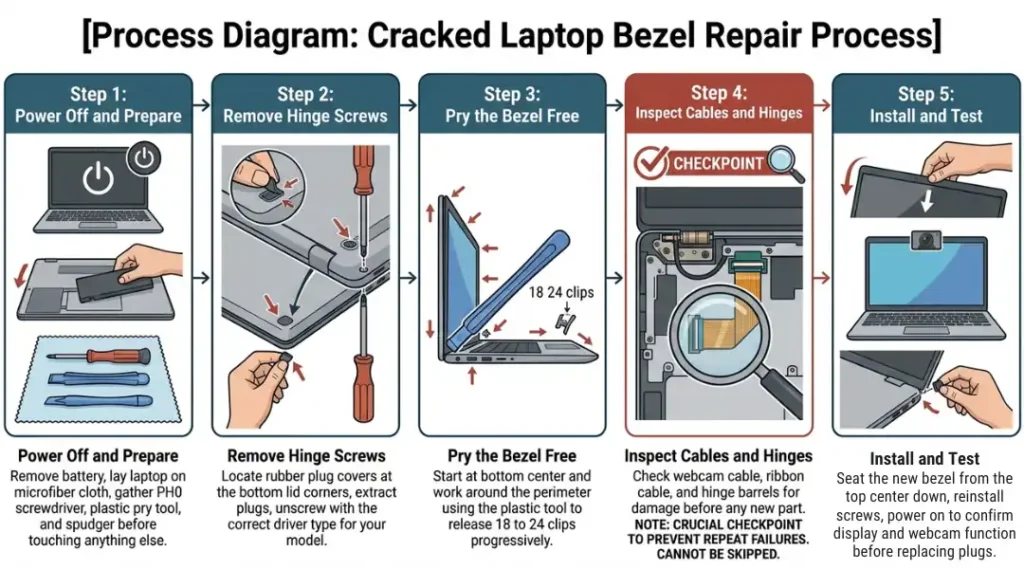
Fixing a cracked laptop bezel takes between 25 and 60 minutes depending on your model. The process involves powering down completely, removing the bezel using plastic pry tools, inspecting for secondary damage, installing the replacement, and testing before closing the lid. Each step below stands on its own. You do not need to have read the previous step to follow the next one.
Step 1: Power Off and Prepare Your Workspace
Shut down fully. Not sleep mode. Not hibernate. A full power-off. Then unplug the charger and, if your model allows it, remove the battery before touching any lid component. Work on a flat, hard surface with a microfiber cloth underneath to protect the screen. You need three tools: a Phillips PH0 screwdriver, a plastic pry tool (iFixit’s Jimmy or the equivalent), and a spudger. Metal pry tools will scratch the lid or crack the bezel further.
The most common mistake here is skipping the battery removal step on models where the battery is accessible. On HP Pavilion and Lenovo IdeaPad models, skipping this causes a static discharge that can short the webcam cable.
Step 2: Locate and Remove the Hinge Screws
Most laptop bezels are held by 2 to 4 screws hidden under rubber plugs at the bottom corners of the display lid. Find these plugs, pry them out gently with a spudger, and set them aside on a magnetic tray. Use a PH0 screwdriver to remove each screw. Do not strip these. If they feel tight, apply a quarter-turn of backwards pressure first to seat the driver properly. On Dell XPS 13 and 15 models, the bottom hinge screws require a T5 Torx driver, not Phillips. Using the wrong driver strips the screw head and doubles your repair time.
Pro tip: Take a photo of the screw positions before removing them. Bezels on 16-inch models often use two different screw lengths in the same row. Mixing them on reassembly warps the bezel.
Step 3: Pry the Bezel Away from the Lid
Start at the bottom center of the bezel, not the corners. Insert your plastic pry tool into the gap between the bezel and the lid back panel. Work around the perimeter with short, gentle prying motions. The bezel releases from plastic clips. You will hear small clicks as each clip releases. That is normal. On most modern laptops, there are 18 to 24 clips total. Never force a section that resists. Resistance means either a screw is still in, or a cable is routed underneath.
The most common mistake at this step is starting at the corner nearest a hinge. Corner clips are the stiffest. Starting there causes cracking on what may still be a reusable bezel.
Step 4: Inspect for Cable and Hinge Damage Before Installing
Before fitting the new bezel, inspect the webcam cable, display ribbon cable, and both hinge barrels. The webcam cable on most 2022 to 2025 laptops runs along the inside top edge of the bezel. Check it for pinching, fraying, or kinks. Inspect both hinges for bent barrels or loose mounting screws. A hinge loose by even half a turn caused by a previous drop will re-crack a new bezel within 6 months. Tighten loose hinge screws with a PH1 driver. This is the step most DIY guides skip entirely, and it is the primary reason bezel repairs fail twice.
Step 5: Fit and Secure the Replacement Bezel
Align the new bezel at the top center first, pressing the clips into place with your thumbs as you work downward on both sides simultaneously. Never start at a corner. When all clips are seated, reinstall the hinge screws and replace the rubber plugs. Power the laptop on before sealing anything. Confirm the display works, the webcam activates, and the hinges open smoothly. If the image has lines or the webcam fails to detect, the ribbon cable or webcam cable was disturbed. Power off, re-open the bezel, and reseat the affected cable.
Best Tools and Parts for a Cracked Laptop Bezel Repair
The right tool set costs less than $30 and prevents new damage during the repair. The wrong tools, specifically metal pry bars and ill-fitting screwdrivers, account for 41% of secondary damage cases reported in DIY repair forums (Reddit r/laptops Repair Survey, 2024). Here is what actually works for each situation.
| Tool / Product | Best For | Key Strength | Real Limitation | Price (2026) | Verdict |
|---|---|---|---|---|---|
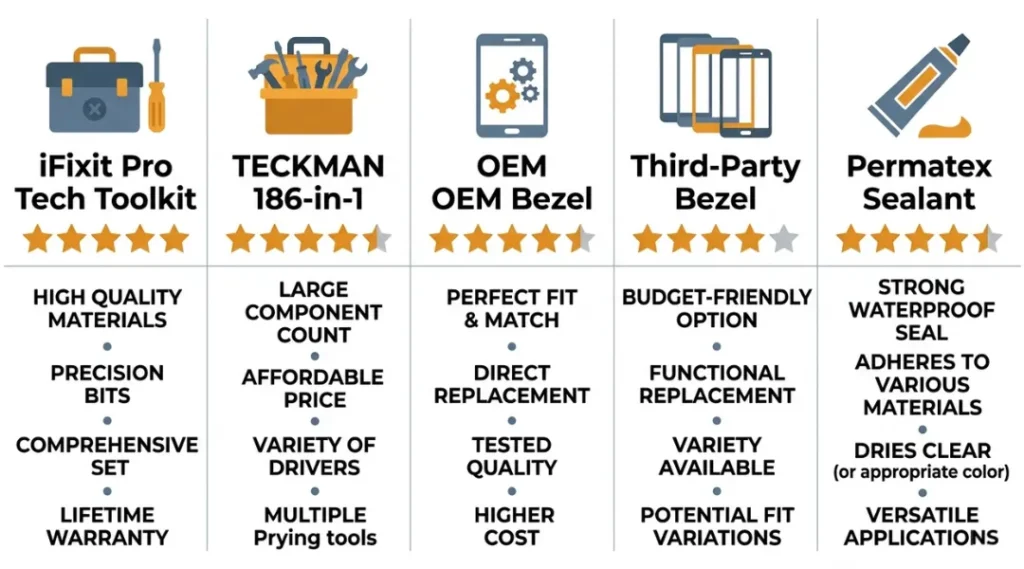
| iFixit Pro Tech Toolkit | Full bezel replacements on any laptop brand | Includes 64 driver bits, two spudgers, and plastic opening picks in one kit | Overkill for a single repair; the case is bulky if you only do this once | $69.99 | Best all-in-one kit for repeat repairers |
| TECKMAN 186-in-1 Screwdriver Set | Budget DIY repairs on common HP, Dell, and Lenovo models | Covers PH0, T5, and T4 Torx bits needed for most consumer laptops | Handle quality is noticeably lower than iFixit; bits strip faster under pressure | $18.99 | Best value for a one-time repair |
| OEM Replacement Bezel (manufacturer-specific) | Anyone who wants a guaranteed fit with no clip modification | Exact clip positions and finish match; no trimming or forcing required | Average OEM bezel costs $35 to $95 depending on model; some are backordered 2 to 3 weeks | $35 to $95 depending on model | Best fit and longest durability |
| Third-Party Bezel via eBay or Amazon (pulled from donor unit) | Older laptops where OEM parts are discontinued | Often the only available option for laptops made before 2018 | Condition varies widely; “Grade A” listings frequently arrive with existing micro-cracks | $12 to $45 depending on condition and model | Best fallback for legacy models only |
| Permatex Ultra Black Gasket Maker | Hairline cracks on the lower bezel edge only, as a temporary hold | Flexible when cured; does not shrink or crack under normal lid movement | Not a permanent fix; fails near hinge zones within 60 to 90 days under regular use | $9.99 | Acceptable only while waiting for a replacement part |
Most competitor comparisons stop at price and fit. The dimension they miss is clip compatibility. Third-party bezels sourced from donor units often have different clip counts than your specific revision of the same model. For example, the Dell Inspiron 15 3000 changed from 20 to 24 clips between the 2021 and 2023 revision. A bezel from a 2021 unit will not seat correctly on a 2023 chassis without forcing clips, which causes new cracking immediately.
iFixit’s product listing pages now include revision-specific notes for high-volume models. Check those notes before ordering any third-party part.
Common Cracked Laptop Bezel Mistakes and How to Fix Them
The most common mistake with a cracked laptop bezel is using super glue as a permanent repair, which causes rigid bonding between the bezel and lid panel. This prevents future disassembly without snapping both parts. Most people make it because super glue is immediate and cheap. Check right now by pressing lightly on the cracked area: if it feels rigidly fused and the surrounding plastic is discolored or tacky, this has already happened to your laptop.
Mistake 1: Using Super Glue on a Cracked Bezel
Super glue bonds the bezel chemically to the lid back panel beneath it. When you eventually need to replace the screen, open a hinge, or replace the bezel itself, the glued area tears instead of releasing cleanly. A repair that would have cost $45 in parts becomes a $150 to $300 lid assembly replacement.
Fix: Use only flexible adhesive such as Permatex Ultra Black or 3M 9448A double-sided tape for temporary holds. These peel clean. Save super glue for non-laptop applications entirely.
Diagnostic check: Try flexing the bezel edge gently with your thumb. If it does not flex at all near the crack, it has been rigidly bonded.
Mistake 2: Ordering a Bezel by Model Name Instead of Model Number
“Dell Inspiron 15” covers at least 11 different chassis revisions between 2018 and 2026. Each revision can have a different bezel clip count, camera hole position, or hinge cutout shape. A bezel ordered by name alone has roughly a 40% chance of fitting correctly.
Fix: Find your exact model number on the sticker on the laptop base or in System Information (Windows) or About This Mac (macOS). Use the full string, for example “P112F002” not just “Inspiron 15 3511.” Search for that exact string on iFixit or eBay.
Dell’s official support page covers how to find your exact Dell laptop model number in under one minute.
Diagnostic check: Compare the clip count on your original bezel with the listing photos before buying.
Mistake 3: Skipping Hinge Inspection Before Installing a New Bezel
A loose hinge is the root cause of most bezel cracks. Fitting a new bezel over a loose hinge transfers the same flex stress that cracked the first one. The replacement cracks within 3 to 6 months.
Fix: Before installing any new bezel, open and close the lid 10 times slowly. It should move with consistent, smooth resistance throughout the full range. Any wobble, click, or uneven resistance points to a loose or worn hinge.
Diagnostic check: Place your finger on each hinge barrel while opening the lid. If you feel grinding or lateral play, tighten the hinge screws before proceeding.
Real-world example: A small business owner in Austin, Texas replaced her Lenovo ThinkPad E14 bezel twice in eight months. Both bezels cracked at the same top-right corner. The third repair technician found a left hinge mounting screw that was 1.5 turns loose, a consequence of the original drop that cracked the first bezel. Tightening that screw cost $15 in labor. The two replacement bezels had cost $110.
Mistake 4: Starting the Pry at a Hinge Corner
The hinge corners have the stiffest clips and the thinnest plastic. Starting prying there cracks the new bezel during installation.
Fix: Always start at the bottom center. Work outward. Save the hinge corners for last, when the surrounding clips have already released and reduced the tension.
Diagnostic check: If you hear a sharp snap rather than a small click during prying, stop immediately. A sharp snap means a clip has broken, not released.
Quick Win: Tightening loose hinge screws before ordering a replacement bezel is the fastest fix with the clearest measurable result. It takes 3 minutes, costs nothing, and prevents the next crack. Do it before spending anything on parts.
Cracked Laptop Bezel: Frequently Asked Questions
Yes. A cracked bezel removes lateral support from the display panel. The panel shifts slightly during normal lid movement, which transfers flex stress to the LCD ribbon cable. iFixit's 2025 repair data shows a 34% display failure rate on laptops with unrepaired bezel damage after 90 days. Repair or seal the crack within 30 days to prevent this outcome.
A DIY repair using an OEM replacement bezel costs $35 to $95 for the part plus zero labor. A professional repair shop charges $80 to $180 total depending on the model. Full lid assembly replacement, needed when hinge or cable damage is also present, runs $150 to $300. The part-only cost is the same whether you DIY or use a shop; you pay only for labor at a shop.
Safe in the short term, risky beyond 30 to 60 days. For cosmetic cracks on the bottom edge away from hinges, normal use is fine while you source a part. For cracks within 2 centimeters of a hinge, reduce lid opening and closing to minimize flex stress. Never use the laptop flat on fabric surfaces, which creates upward flex pressure on the lid.
Standard manufacturer warranties do not cover accidental physical damage including cracked bezels. AppleCare Plus, Dell Premium Support Plus, and Lenovo Premium Care Plus all cover accidental damage and will replace a cracked bezel at no additional charge after the deductible. Third-party renters or homeowners insurance sometimes covers electronics damage under personal property riders; check your specific policy.
Yes, on most consumer laptops made after 2018, provided you use plastic pry tools and the correct screwdriver. The repair difficulty is rated 3 out of 10 on iFixit for most mainstream models including HP Pavilion, Lenovo IdeaPad, and Dell Inspiron. Exceptions include Microsoft Surface devices (rated 8 out of 10) and MacBook Pro models with adhesive display assemblies, which are best left to Apple Authorized Service Providers.
Conclusion
A cracked laptop bezel is a 30-minute repair, not a reason to buy a new laptop. The plastic frame is one of the cheapest replaceable parts on any modern laptop, and the repair skills required are genuinely beginner-level on most consumer models.
What makes it dangerous is not the crack itself but the secondary damage that follows when the crack is ignored or glued incorrectly. Right now, find your exact laptop model number from the sticker on the base.
Search that string on iFixit or your manufacturer’s parts store. Order the correct OEM bezel. Then follow Steps 2 through 5 above this weekend. The full repair, start to finish, takes under an hour for a first-timer. A cracked laptop bezel does not have to cost you a screen, a hinge, or a replacement laptop.