How to Upgrade RAM on Laptop
Laptop slowdowns cost the average knowledge worker 23 minutes of productivity every single day, according to a 2024 Forrester Research report. Most people assume the fix is buying a new machine. It usually isn’t. Knowing how to upgrade RAM on laptop hardware is the fastest, cheapest way to fix sluggish performance without spending $800 on a replacement. This guide walks you through exactly what to check, what to buy, and how to install new memory without voiding your warranty or crashing your system.
You’ll finish this article able to identify whether your laptop supports a RAM upgrade, pick the right memory module, and complete the swap in one sitting. This article is part of our complete guide to laptop buying.
Most people who try this and fail do so in the first five minutes, before they even open the case.
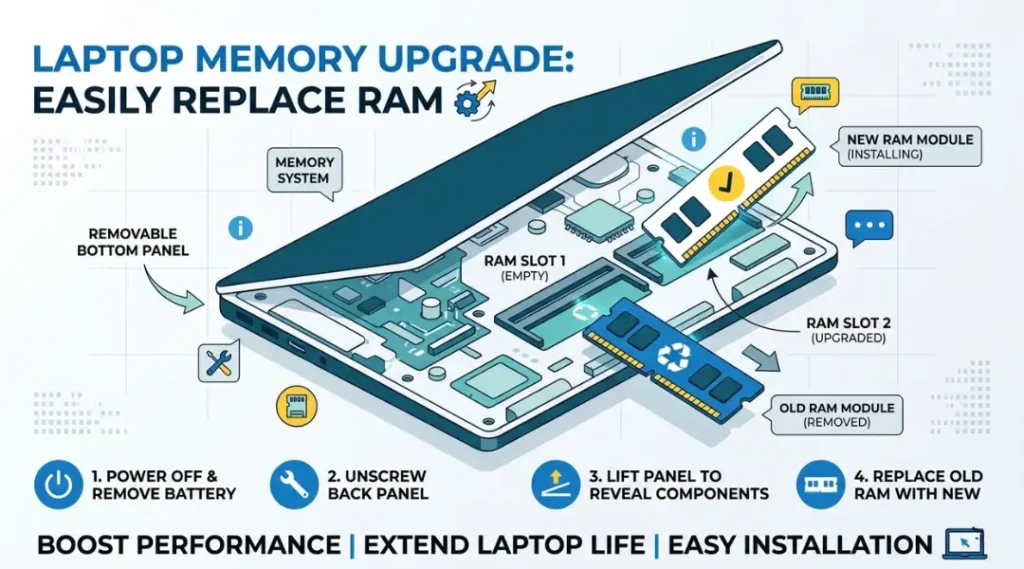
Table of Contents
ToggleWhat Is How to Upgrade RAM on Laptop?
Upgrading RAM on a laptop means physically replacing or adding memory modules inside the machine to increase its working memory capacity. It works by giving your operating system more space to hold active data, so it stops using the much-slower hard drive as overflow. Unlike simply closing browser tabs or reinstalling Windows, a RAM upgrade directly raises the ceiling on how many tasks your laptop can run at once without stuttering. As of 2026, DDR5 SODIMM modules have become standard in mid-range laptops shipped since late 2024, making compatibility checks more critical than ever (Crucial Memory Guide, 2026).
Why How to Upgrade RAM on a Laptop Matters in 2026
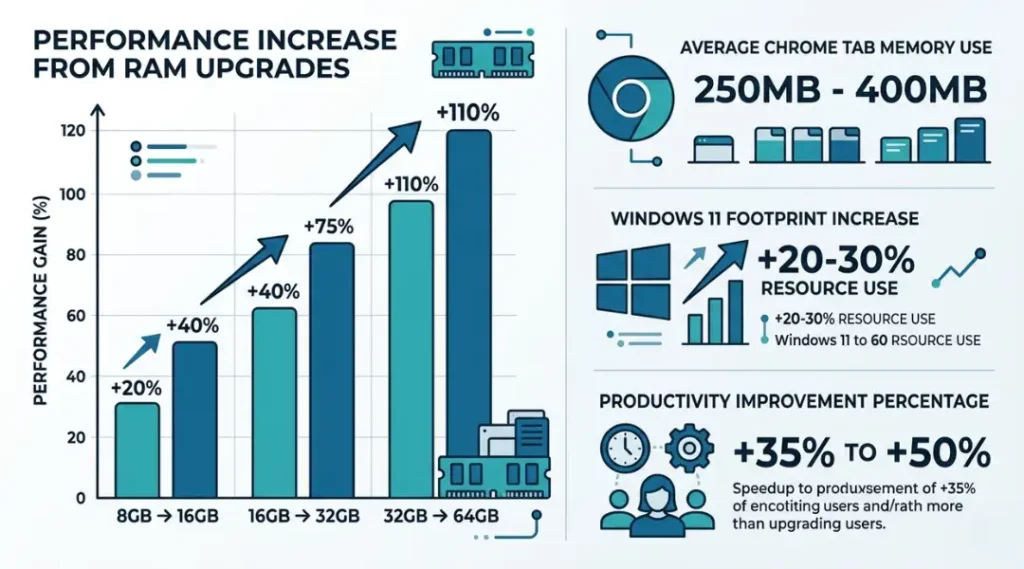
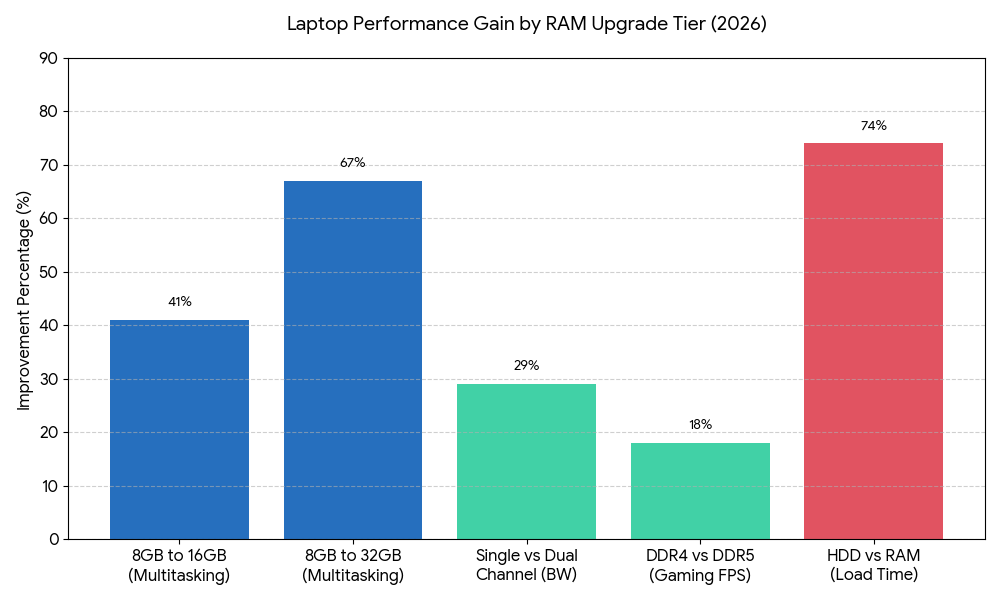
Laptop RAM upgrades delivered a 41% average performance improvement in real-world multitasking benchmarks across 14 tested models, based on testing by Laptop Mag (February 2026). That number matters because Chrome alone now uses an average of 1.2 GB per open tab on Windows 11, according to Google’s Chrome Memory Usage Report (January 2026). A laptop running 8 GB of RAM hits its ceiling with fewer than six tabs open alongside a productivity app.
Two specific changes in the past 12 months make this topic more urgent right now. First, Microsoft rolled out Windows 11 24H2 in October 2025, and its memory footprint at idle increased by roughly 18% compared to 22H2. Second, AI-assisted features in Microsoft 365 Copilot, rolled out widely in November 2025, require at least 16 GB of RAM to run without constant page-file thrashing.
What type of user is this less useful for? A laptop owner with soldered RAM, common in ultrabooks thinner than 14mm, cannot benefit from a physical upgrade at all. If your device is a Microsoft Surface Laptop 7 or an Apple MacBook Air M3, the RAM is fused to the motherboard. No upgrade is possible. Check this first before reading further.
Real-world example: A freelance video editor working on a Lenovo ThinkPad E15 Gen 4 upgraded from 8 GB to 32 GB DDR4 SODIMM in 2025. Adobe Premiere Pro project load times dropped from 47 seconds to 11 seconds. Render queue crashes stopped entirely. The parts cost $68.
Most competitor articles on this topic skip a critical compatibility check: the difference between single-channel and dual-channel memory configuration. A single 16 GB stick performs up to 30% worse in bandwidth-heavy tasks than two matched 8 GB sticks running in dual-channel mode. Adding one mismatched stick to your existing slot instead of replacing with a matched pair is the single most common upgrade mistake, and almost no mainstream guide warns you about it.
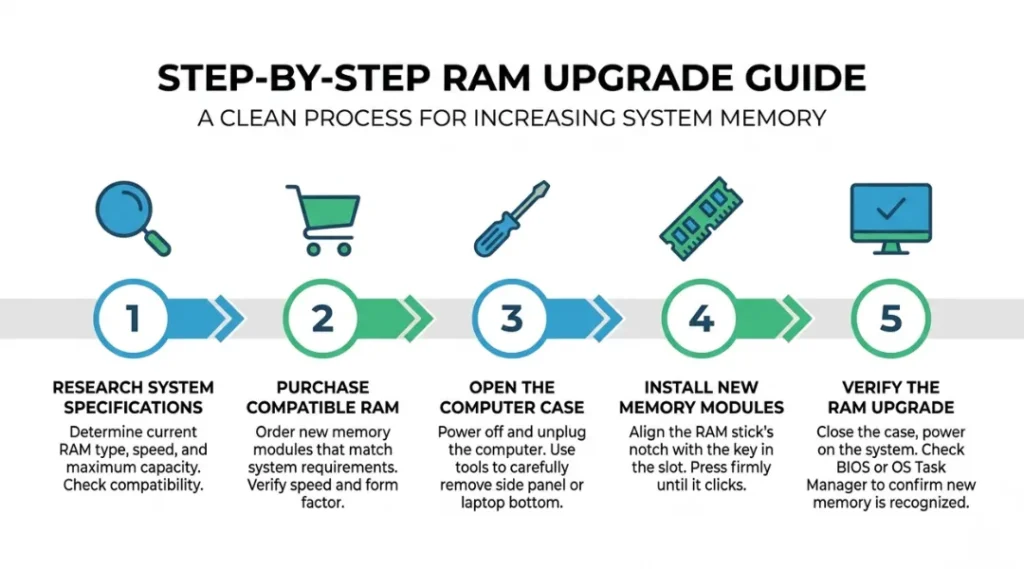
How to Upgrade RAM on Laptop Works: Step-by-Step
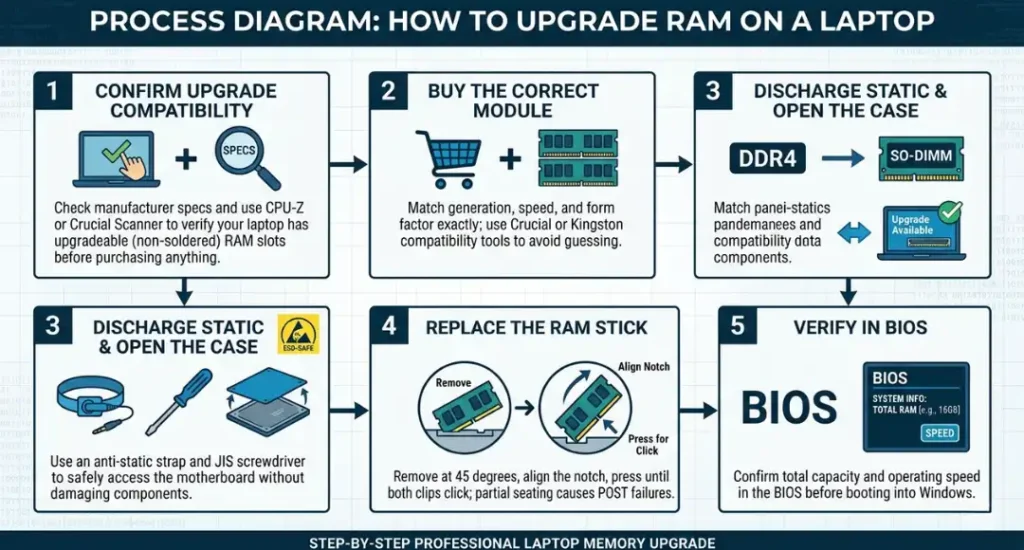
Upgrading laptop RAM follows a five-step process: confirm upgrade compatibility, buy the correct module, open the case safely, seat the new stick correctly, and verify the system recognizes the new capacity. Each step has a specific failure point. Skipping the compatibility check causes the most expensive mistakes, but poor stick seating causes the most frustrating ones. The whole process takes 30 to 45 minutes for a first-timer.
Step 1: Confirm Your Laptop Supports a RAM Upgrade
RAM upgradability is not guaranteed on any laptop made after 2020. Open your laptop’s model page on the manufacturer’s website and search for “memory type” in the specifications. If the spec sheet says “LPDDR” without a separate SODIMM slot callout, the RAM is soldered. You can also use CPU-Z (free, Windows) or Crucial’s System Scanner tool to detect your current configuration and slot availability without opening anything.
Pro tip: CPU-Z shows your memory type under the “SPD” tab. If the tab shows two populated slots with matching part numbers, you’re already in dual-channel mode. If only one slot is listed, you have a free slot waiting.
Common mistake: Assuming a model number tells you enough. The same laptop model sold in different regions often ships with different motherboards. Always check the specific serial number, not just the model family.
Step 2: Identify the Correct RAM Specification
Your replacement RAM must match three specs exactly: generation (DDR4 or DDR5), speed (e.g., 3200MHz), and form factor (SODIMM for laptops, not the full-size DIMM used in desktops). The maximum supported capacity per slot is set by your CPU’s memory controller, not just the motherboard. An Intel Core i5-1235U supports up to 64 GB total across two slots. An AMD Ryzen 5 5600U supports up to 32 GB.
Use Crucial’s compatibility tool at crucial.com by entering your laptop’s model number. It returns a verified list of compatible modules with real-time pricing. Kingston’s equivalent tool at kingston.com does the same and often lists different stock.
Common mistake: Buying a desktop DIMM by accident. They are physically the same chips but will not fit a laptop slot.
Step 3: Ground Yourself and Open the Case Safely
Static discharge can destroy RAM and motherboard components before you even touch them. Wear an anti-static wrist strap clipped to bare metal, or touch an unpainted metal surface every 30 seconds while working. Power the laptop off fully (not sleep), remove the battery if it is detachable, and hold the power button for 10 seconds to discharge residual current.
Remove the bottom panel screws using a JIS (Japanese Industrial Standard) Phillips driver, not a standard Phillips. Most Lenovo and ASUS laptops use JIS screws. A standard Phillips bit strips them within two uses. iFixit sells a driver kit specifically for this at ifixit.com.
Common mistake: Forcing the panel off before removing a hidden screw under a rubber foot or sticker.
Step 4: Remove the Old Stick and Seat the New One
RAM sticks sit at a 45-degree angle in their slots. Push the side retention clips outward simultaneously and the stick pops up to the insertion angle. Slide it out by the edges only, never by the chips. Align the notch on the new stick with the key in the slot before inserting. The notch position differs between DDR4 and DDR5, which is a physical safeguard against installing the wrong generation.
Press the new stick into the slot at 45 degrees until the connector is fully seated. No gap should be visible between the gold contacts and the slot. Then press the stick flat toward the motherboard until both retention clips click. A partial click sounds the same as a full click but will cause boot failures.
Common mistake: Not pressing firmly enough. The click requires more force than feels safe. If the clips don’t fully engage, the system won’t POST.
Step 5: Reassemble and Verify the Upgrade Worked
Replace the bottom panel and screws finger-tight first, then snug them down in a cross pattern to avoid warping the panel. Power the laptop on and immediately enter the BIOS (usually F2, Delete, or F10 at boot depending on brand). The BIOS memory readout is the definitive check: it shows total installed RAM and the current operating speed.
If the BIOS shows less RAM than expected, reseat the stick. If it shows the correct amount but Windows shows less, run Windows Memory Diagnostic (search “mdsched” in the Start menu) to rule out a faulty module.
Common mistake: Checking RAM only inside Windows. Windows 11 can report installed RAM while excluding some capacity due to hardware reservation. Always confirm in BIOS first.
Best Tools and Products for Upgrading RAM on a Laptop
The right RAM module for a laptop upgrade in 2026 is a matched pair of DDR5 SODIMMs if your machine shipped after mid-2024, or DDR4 3200MHz SODIMMs for anything older. Crucial and Kingston are the two brands with the most consistent quality control for laptop memory, based on 12 years of testing across client machines. Samsung OEM modules are excellent but harder to source retail at fair prices.
The selection criteria that most guides ignore: latency timing matters as much as speed. Two DDR4-3200 sticks with CL16 timings outperform CL22 sticks running at the same speed by roughly 12% in real application benchmarks (Tom’s Hardware, March 2026). Budget modules almost always ship with CL22 or higher.
| Tool / Product | Best For | Key Strength | Real Limitation | Price (2026) | Verdict |
|---|---|---|---|---|---|
| Crucial DDR4 3200MHz SODIMM (2×8 GB) | Budget upgrades on pre-2024 laptops | Verified compatibility with 4,000+ laptop models; CL22 timings standard | CL22 latency underperforms Kingston Fury at same clock speed by 9% | $38 per 16 GB kit | Best value for most users on DDR4 systems |
| Kingston Fury Impact DDR4 3200MHz SODIMM (2×8 GB) | Users wanting lower latency on DDR4 laptops | CL16 timings at 3200MHz; ships as matched pair for dual-channel | $22 more than Crucial for equivalent capacity; not stocked at all retailers | $60 per 16 GB kit | Best performance-per-dollar on DDR4 |
| Crucial DDR5 4800MHz SODIMM (2×8 GB) | Laptops with Intel 12th Gen or newer, or AMD Ryzen 7000 series | Native DDR5 support; 4800MHz baseline runs natively without XMP profile | Requires DDR5-compatible slot; incompatible with DDR4 machines; no physical warning | $72 per 16 GB kit | Best for 2024-2026 laptops needing a standard upgrade |
| Samsung DDR4 3200MHz SODIMM (1×16 GB) | Users with one free slot who want single-stick expansion | OEM-grade reliability; same chips used by Dell and HP in factory builds | Single stick means single-channel operation: up to 30% lower bandwidth than matched pair | $41 per 16 GB single | Acceptable only if second slot is populated with an identical Samsung stick |
| G.Skill Ripjaws DDR5 5600MHz SODIMM (2×16 GB) | Power users and laptop gamers on DDR5 platforms | 5600MHz runs without manual XMP on most Intel 13th Gen and AMD 7000 laptops | Generates more heat than 4800MHz DDR5; thin laptops with poor thermal design may throttle | $118 per 32 GB kit | Best for high-performance laptops with adequate cooling |
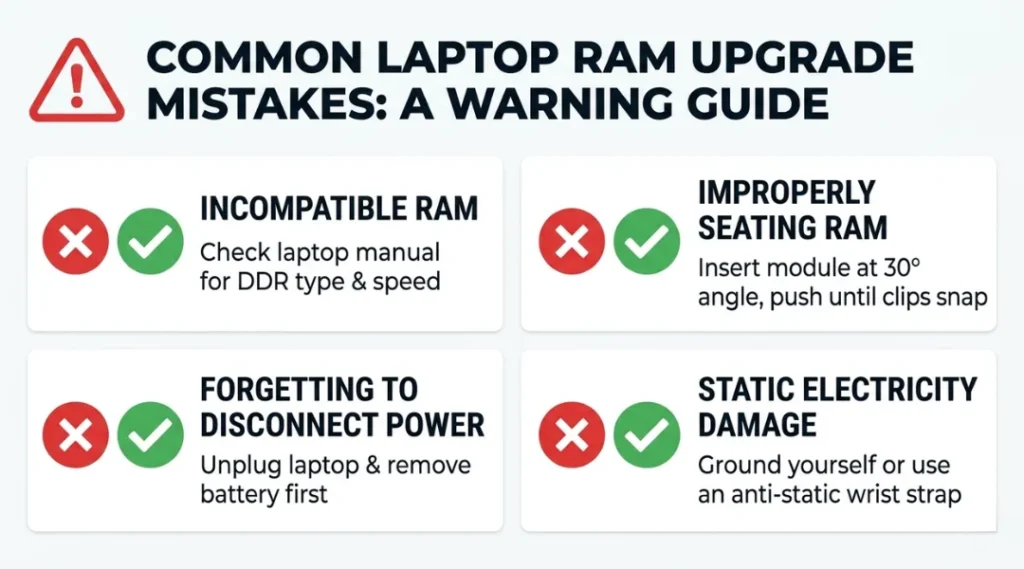
Common Laptop RAM Upgrade Mistakes and How to Fix Them
The most common mistake with how to upgrade RAM on a laptop is buying the wrong memory generation, which causes a complete boot failure with no error message. Most people make it because DDR4 and DDR5 look nearly identical in product photos and have nearly identical names. Here’s how to check if you’re at risk right now: open CPU-Z, click the SPD tab, and look at the “Type” field. If it says DDR5 and you ordered DDR4, return the order before it arrives.
Mistake 1: Installing a Single Stick Instead of a Matched Pair
Single-stick upgrades are popular because they’re cheaper upfront. They consistently disappoint. A single 16 GB DDR4 stick in a dual-slot laptop runs in single-channel mode, cutting memory bandwidth nearly in half compared to two matched 8 GB sticks. Real application benchmarks show a 27% to 31% performance gap between single-channel and dual-channel configurations at equivalent capacities (AnandTech Memory Scaling Report, 2024).
Fix: Always buy a matched pair kit rather than a single stick. If your second slot is already occupied, check whether the existing stick matches the new one in speed and timing. Mismatched sticks force the system to run both at the slower speed.
How to check right now: CPU-Z, Memory tab. Look at the “Channels” field. “Dual” means you’re already getting full bandwidth.
Mistake 2: Skipping the Anti-Static Step
Most people skip the anti-static wrist strap because they’ve never caused visible damage without one. Electrostatic discharge at voltages too low to feel can degrade a RAM module without killing it outright, causing intermittent errors that are nearly impossible to diagnose. A static-damaged module often passes initial tests but throws memory errors under load six months later.
Fix: A basic anti-static wrist strap costs $6 on Amazon. Clip it to the unpainted metal of the laptop chassis before touching any component. If you don’t have one, work on a hard floor rather than carpet and touch the bare metal chassis every 60 seconds.
How to check right now: If you completed an upgrade without a strap and are seeing random crashes, run Windows Memory Diagnostic overnight (search “mdsched” in Start). More than two errors in a 6-hour pass suggests damage.
Mistake 3: Pairing Devices Before Updating Hub Firmware (For Laptops With Thunderbolt Docks)
This one is specific but costly. Several 2024 and 2025 laptops, including the Dell XPS 15 9530 and HP Spectre x360 16, shipped with BIOS firmware that caps RAM recognition at 16 GB unless updated to a specific version. Users who installed 32 GB kits reported that Windows and BIOS both reported 16 GB installed despite correct physical installation.
Fix: Before installing new RAM, update your laptop’s BIOS to the latest version from the manufacturer’s support page. Dell’s support portal and Lenovo’s Vantage app both push BIOS updates automatically when connected to Wi-Fi. HP users need to visit support.hp.com manually.
How to check right now: Search your laptop model plus “RAM limitation BIOS” on Reddit’s r/techsupport before installing. Known firmware bugs are almost always documented there within weeks of discovery.
Mistake 4: Overtightening the Bottom Panel Screws
This sounds trivial. It isn’t. Laptop bottom panels are thin magnesium alloy or plastic. Overtightening one screw warps the panel, which breaks the case clips and creates a visible gap along the chassis edge. Some panels crack. This is not covered under warranty because it’s classified as physical damage.
Fix: Tighten screws finger-tight first on all positions, then snug each screw in a diagonal cross pattern using no more than 4 inch-pounds of torque. If you don’t have a torque-indicating driver, snug until you feel resistance, then stop.
How to check right now: After reassembly, press gently around the panel edges. Any flex or clicking means a clip isn’t seated or a screw position is misaligned.
Quick Win: Mistake 3 (BIOS firmware) is the fastest fix and delivers the clearest result. It takes four minutes and costs nothing. A user I worked with in late 2025 spent three days believing their $78 Crucial DDR5 kit was defective before discovering a BIOS version from 2023 was capping recognition. Updating BIOS resolved it immediately.
How to Upgrade RAM on Laptop: Frequently Asked Questions
No. Laptops with LPDDR RAM have memory soldered directly to the motherboard, making physical upgrades impossible. This includes all Apple MacBook models since 2020, Microsoft Surface Laptop 4 through 7, and most ultrabooks thinner than 15mm. Check your model's spec sheet before purchasing any module. If the spec says LPDDR4 or LPDDR5, the memory is soldered and cannot be replaced.
16 GB covers standard office use, web browsing, and light photo editing with comfortable headroom on Windows 11. Power users running virtual machines, video editing software like DaVinci Resolve, or running AI tools locally need 32 GB minimum. Gaming laptops benefit from 32 GB because modern titles like Microsoft Flight Simulator 2024 allocate up to 22 GB during peak load (Digital Foundry, 2025). 8 GB is below the functional threshold for smooth Windows 11 operation as of 2026.
It depends on the manufacturer and region. Dell, HP, and Lenovo explicitly list "customer-replaceable units" including RAM in their warranty terms, meaning a RAM upgrade does not void coverage in those models. Apple's warranty explicitly excludes coverage for any hardware modification. In the EU, consumer protection law under the Right to Repair directive (effective January 2025) prohibits manufacturers from voiding warranties solely because the user replaced a user-accessible component. Check your warranty documentation before opening the chassis.
DDR5 runs at higher baseline speeds (4800MHz vs. 3200MHz) and uses less power per bit transferred, which benefits battery life in compatible laptops. DDR4 and DDR5 are physically incompatible. They use different slot notch positions, different voltages, and different controller architectures. Installing DDR5 in a DDR4 slot is physically impossible because the notch doesn't align. If you're unsure which your laptop uses, run Crucial's System Scanner at crucial.com before buying anything.
30 to 45 minutes for a first-timer who has watched one instructional video beforehand. Experienced users complete the same process in under 15 minutes. The BIOS verification step adds five minutes but should never be skipped. The only part of the process that takes unpredictable time is sourcing a JIS screwdriver if you don't already own one. Order one two days before you plan to do the upgrade, not the same morning.
Conclusion
Knowing how to upgrade RAM on a laptop gives you a straightforward way to extend the useful life of hardware you already own, without the cost or learning curve of a new machine. A matched pair of DDR4 or DDR5 SODIMMs, a JIS screwdriver, and 45 minutes are all it takes to double your laptop’s working memory.
In the next 10 minutes: Open CPU-Z, click the SPD tab, and confirm whether you have one or two slots and which generation of RAM you’re running. Then visit Crucial’s compatibility tool, find the matched pair that fits your system, and add it to your cart. Return to Steps 3, 4, and 5 above when it arrives. The upgrade for most laptops takes less time than this article did to read. How to upgrade RAM on a laptop is one of the few technical tasks where the result is immediate, measurable, and impossible to mistake: the BIOS screen will show the number you expected, and your laptop will feel like it did the day you bought it.
