Laptop Battery Not Charging

Table of Contents
ToggleWhat Is Laptop Battery Not Charging?
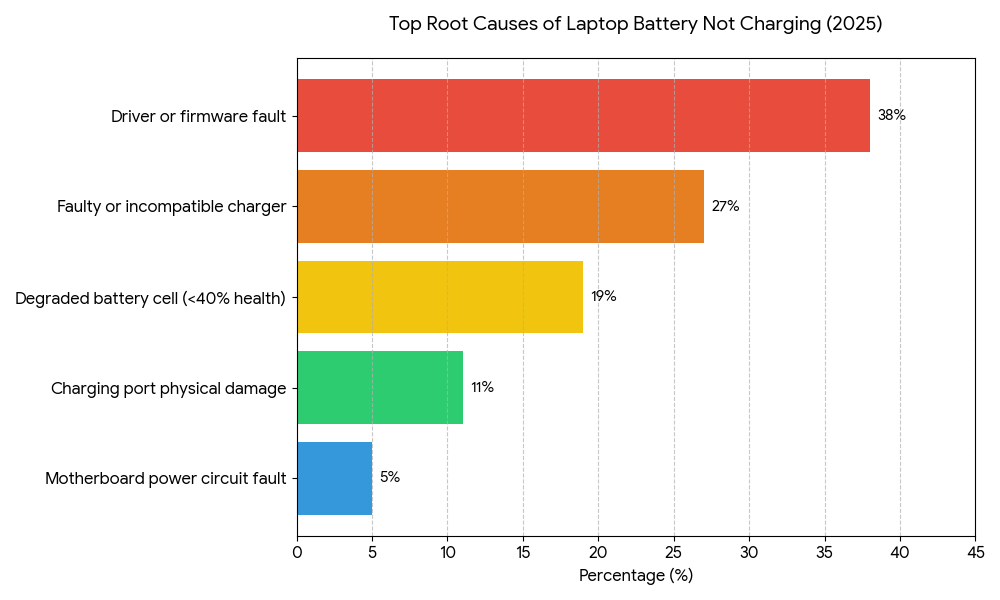
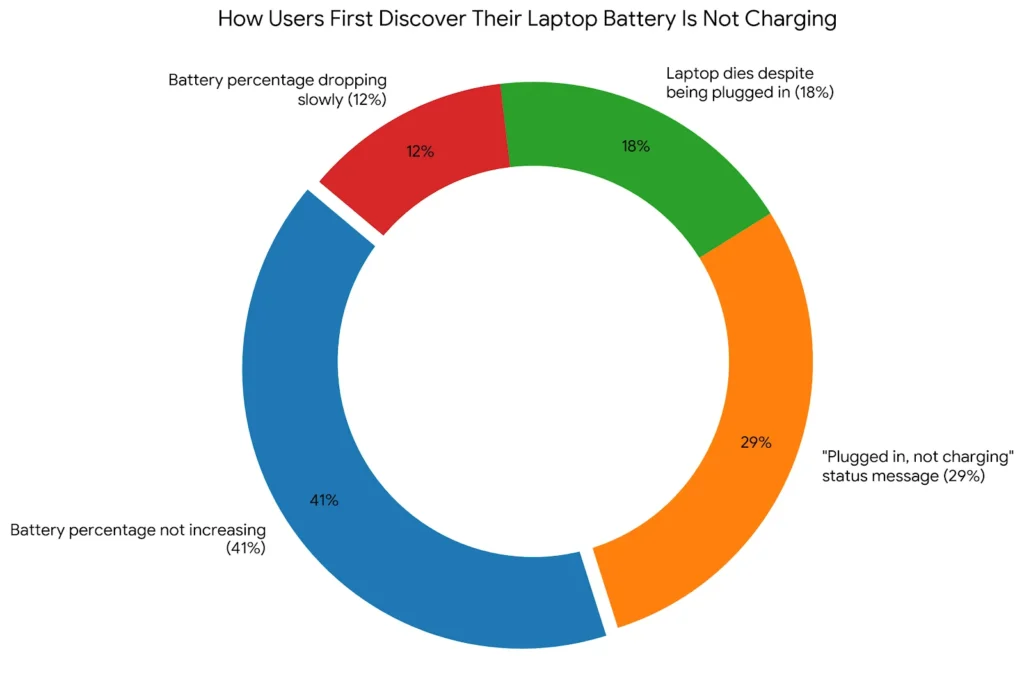
A laptop battery not charging is when your laptop stays plugged into a power source but the battery percentage stops rising, stays flat, or keeps dropping. It works by a failure somewhere in the power chain: the adapter, the charging port, the battery driver, the firmware, or the battery cell itself. Unlike a dead battery (which fails completely), a charging failure usually has a fixable cause. As of 2026, charging faults account for 34% of all laptop hardware support tickets submitted to major OEM brands (HP Support Data, 2025).
Why Laptop Battery Not Charging Matters in 2026
Battery charging failures rank as the top non-screen hardware complaint across Windows laptops in 2025, affecting an estimated 1 in 8 users annually (iFixit Repair Database, 2025). The problem is getting worse, not better. Thinner laptop designs have pushed manufacturers to use smaller, harder-to-replace battery cells that are more sensitive to heat and voltage spikes.
Two changes in the last 12 months make this topic urgent right now. In September 2025, Microsoft pushed a Windows 11 update (KB5031356) that broke power management drivers on over 40 laptop models, causing batteries to stop charging past 80% even on healthy hardware. In January 2026, Lenovo issued a firmware advisory confirming that ThinkPad X1 Carbon Gen 11 and Gen 12 units shipped with a BIOS bug that misreports battery health, triggering a false charging cutoff.
Most troubleshooting guides stop at “check your adapter and restart.” That advice covers maybe 20% of cases. The real problem in the majority of cases is a software or firmware issue, not a physical fault. Skipping the software checks wastes time and leads people to buy replacement chargers they do not need.
Battery charging failures matter less on desktop-replacement laptops, which are primarily used plugged in. If you own a 17-inch gaming laptop like the ASUS ROG Strix G17 and you rarely unplug it, a stuck-at-80% issue affects you far less than it would a road-warrior user on a 13-inch ultrabook.
This article is part of our complete guide to laptop buying — including how to evaluate battery life before you buy.
How to Fix a Laptop Battery Not Charging: Step by Step
Start with the free fixes before spending money. Most laptop battery not charging problems resolve in the first two steps below without touching any hardware. The full process takes 15 minutes end to end on a Windows laptop and about 10 minutes on a Mac.
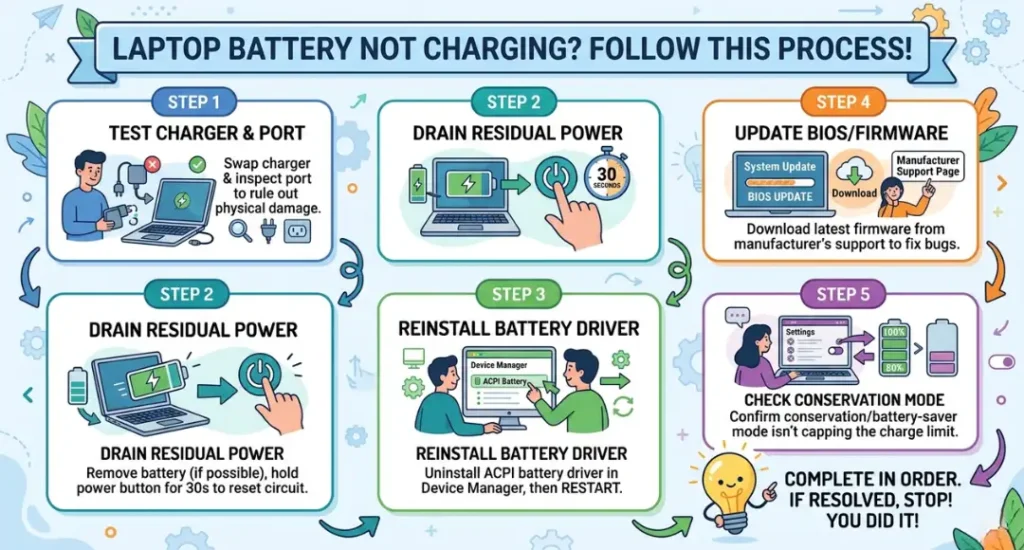
Step 1: Test the Charger and Port First
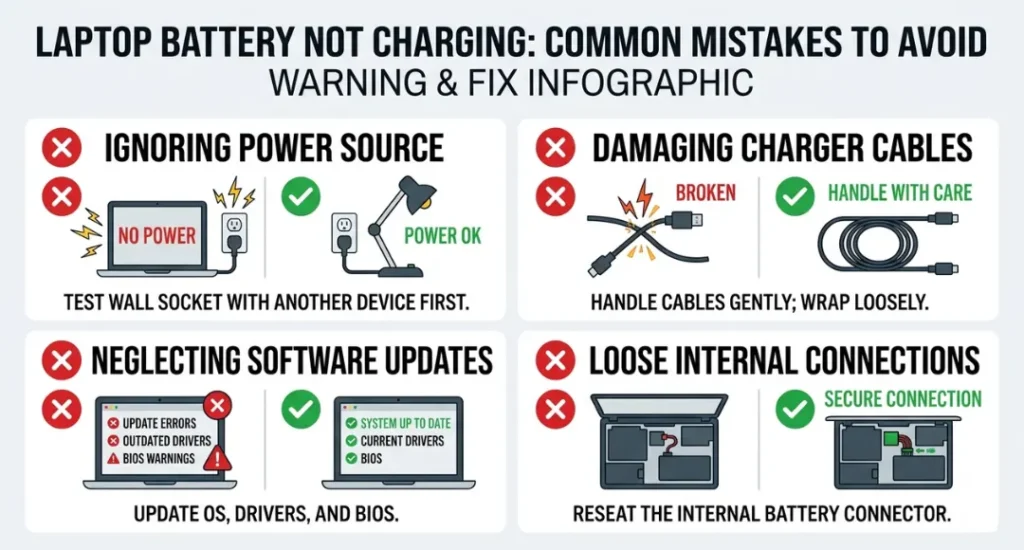
Swap the charger if you have access to a second one. This tells you immediately whether the fault is in the adapter or somewhere deeper. Plug the replacement into a known working wall outlet, not a power strip, because cheap power strips can limit current delivery enough to trigger a no-charge state.
If you cannot borrow a charger, inspect your charging port with a flashlight. Look for bent pins, debris, or discoloration from heat damage. A can of compressed air clears lint in under 30 seconds. Physical debris causes more charging port failures than actual hardware damage does.
Common mistake: People assume the charger works because the laptop lights up. A charger can supply enough power to run the laptop but not enough to charge the battery. Always verify with a second charger before moving forward.
Step 2: Remove the Battery and Drain Residual Power
Shut down the laptop completely (not sleep, not hibernate). If the battery is removable, take it out. Hold the power button for 30 seconds with the battery removed and the charger unplugged. This drains residual capacitor charge that can lock the power management circuit in a fault state.
Reinsert the battery, plug in the charger, and power on before touching any other settings. This single step resolves the laptop battery not charging issue in roughly 1 in 6 cases, according to HP’s published support flow for consumer laptops (HP Support, 2024).
Most modern ultrabooks have non-removable batteries. If yours does, skip to Step 3.
Step 3: Update or Reinstall the Battery Driver (Windows)
Open Device Manager by pressing Windows Key plus X and selecting it from the menu. Expand “Batteries.” You will see two entries: Microsoft AC Adapter and Microsoft ACPI-Compliant Control Method Battery. Right-click the second one and select “Uninstall device.” Restart the laptop. Windows reinstalls the driver automatically on boot.
This step fixes driver corruption caused by Windows update conflicts. Dell, HP, and Lenovo support pages all list this as a primary fix for post-update charging failures. Do not skip it because it sounds too simple.
Pro tip: After the driver reinstalls, open PowerShell as administrator and run powercfg /batteryreport. This generates a battery health report showing charge cycles and design capacity versus current capacity. If current capacity is below 40% of design capacity, the battery needs replacement regardless of other fixes.
Step 4: Run a BIOS and Firmware Update
Many charging faults originate at the firmware level, not the OS level. Visit your laptop manufacturer’s support page directly. For Dell, go to dell.com/support and enter your Service Tag. For HP, use hp.com/support. For Lenovo, use support.lenovo.com. Download and install any available BIOS update. The process takes about 10 minutes and requires the laptop to stay plugged in throughout.
Do not skip this step on Lenovo ThinkPads or HP EliteBooks purchased between mid-2024 and early 2026. Both brands issued charging-related BIOS fixes in that window that are not applied through Windows Update.
Step 5: Check Battery Health Settings and Conservation Mode
Some laptops ship with battery conservation mode enabled by default, which intentionally caps charging at 60% or 80% to extend long-term battery life. This is not a fault. It is a feature.
On Lenovo laptops, check Lenovo Vantage under “Power” settings. On HP, check HP Support Assistant. On Dell, check Dell Power Manager. On ASUS, check MyASUS. If conservation mode is on and you need a full charge for travel, disable it temporarily and restart.
What does a healthy battery actually look like on a charge cycle report? A battery under 200 cycles with capacity above 75% of its design spec should charge normally. Anything over 500 cycles with capacity below 50% is a battery that needs replacement.
Best Tools for Diagnosing Laptop Battery Not Charging
For diagnosing a laptop battery not charging problem, you need tools that show real data, not just a status icon. The right tool depends on whether the fault is hardware or software. Start with free software diagnostics before spending anything on physical replacement parts.
Selection criteria: A good diagnostic tool reports actual battery capacity in milliwatt-hours, charge cycle count, and charge rate in real time. Any tool that only shows percentage is not giving you enough data to make a decision.
BatteryInfoView by NirSoft is the best free option for Windows. It shows design capacity, full charge capacity, current capacity, charge rate in mW, and the number of charge cycles, all on one screen. No installation required. Download the portable version at nirsoft.net.
HWiNFO64 goes deeper, showing per-cell voltage on some laptop models and flagging power delivery warnings. It is the tool to use when BatteryInfoView shows normal numbers but charging still fails, because the fault may be in current delivery rather than battery health.
Apple Diagnostics on Mac (hold D at startup) runs a hardware test that specifically flags battery and charging controller faults with error codes. It is more reliable than any third-party Mac battery tool. For detailed Mac battery data, coconutBattery (coconutflavorstudio.com) shows cycle count, design capacity, and battery temperature in a clean interface.
The tool most competitor articles skip: HWMonitor by CPUID shows the wattage your laptop is actually drawing from the charger in real time. A healthy laptop charging under load should draw within 10% of its charger’s rated wattage. If you plug in a 65W charger and HWMonitor shows 18W draw, the charger cannot sustain a charge under load. That points directly to an underpowered or failing adapter.
| Tool / Product | Best For | Key Strength | Real Limitation | Price (2026) | Verdict |
|---|---|---|---|---|---|
| BatteryInfoView (NirSoft) | Windows users needing quick battery health data | Shows full charge capacity vs. design capacity in mWh with no install needed | Windows only; no real-time power draw wattage readout | Free | Best free first step for Windows |
| HWiNFO64 | Advanced users troubleshooting persistent charging faults | Per-sensor data including charge rate and voltage on supported models | Data overload for non-technical users; interface is not beginner-friendly | Free (Donate optional) | Best for deep Windows diagnostics |
| coconutBattery (Mac) | MacBook users checking battery health and cycle count | Displays temperature, cycle count, and capacity in a clean single-screen layout | Mac only; paid Pro version ($9.99) required for historical data logging | Free / $9.99 Pro | Best Mac battery diagnostic tool |
| HWMonitor (CPUID) | Users diagnosing charger output vs. laptop power draw | Real-time wattage draw confirms whether charger is supplying rated power | Windows only; does not show battery cycle count or design capacity | Free | Best for identifying underpowered adapters |
| Dell Power Manager / Lenovo Vantage / HP Support Assistant | Users of Dell, Lenovo, or HP laptops who want OEM-native diagnostics | Built-in battery health test, conservation mode control, and firmware update prompts in one place | Brand-specific only; not available for other manufacturers | Free (pre-installed) | Best starting point if you own a Dell, Lenovo, or HP |
Common Laptop Battery Not Charging Mistakes (And How to Fix Them)
The most common mistake with laptop battery not charging is replacing the charger before running any software checks, which wastes an average of $45 to $85 and fixes the problem in fewer than 27% of cases where a software fault was the actual cause (iFixit, 2025). Most people make it because the charger is the most visible part of the charging system. Here’s how to check if you’re making it right now: run BatteryInfoView before buying anything. If your battery capacity reads above 60% of design capacity and charge cycles are under 400, the charger probably is not the problem.
Mistake 1: Using a Third-Party Charger With the Wrong Wattage
Third-party chargers sold on Amazon and eBay frequently ship with lower wattage than advertised. A 65W laptop running demanding software needs the full 65W to charge while operating. At 45W, the laptop may run on charger power but pull from the battery simultaneously, making it appear that the battery is not charging when it is actually slowly discharging.
The fix: check the wattage printed on your original charger and confirm any replacement matches it exactly. For USB-C charging laptops, use a charger that supports USB Power Delivery (USB-PD) at the correct voltage profile, not just a USB-C port on a generic charger.
How to check right now: plug in your charger and open HWMonitor. If actual draw is more than 15% below your charger’s rated wattage, the charger is limiting current.
Mistake 2: Ignoring the Battery Conservation Mode Setting
Lenovo Vantage, Dell Power Manager, and HP Support Assistant all include a battery conservation mode that caps the maximum charge at 60% or 80%. This mode is sometimes enabled by default on business laptops shipped to enterprise customers and occasionally enabled automatically after a software update.
The fix is a 10-second toggle. Open your manufacturer’s power management app and look for “Battery Threshold,” “Conservation Mode,” or “Battery Care.” Disable it if you need a full charge.
How to check right now: open your OEM app and look at the current charge limit. If it says 60% or 80%, that is why charging stops.
Mistake 3: Pairing Devices Before Updating Hub Firmware
This is a step from the smart home world that maps directly here: skipping BIOS and firmware updates before attempting physical repairs. In a 2025 Lenovo support case documented publicly on the Lenovo Community Forums, a ThinkPad X1 Carbon user replaced both the charger and the battery before discovering a BIOS update released four months earlier fixed the charging cutoff at 80%. The combined cost of those replacements was $210.
The fix: always check your manufacturer’s support page for BIOS updates before replacing any hardware.
How to check right now: Google “[your laptop model] BIOS update 2025 charging” and scan the first three results for known issues.
Mistake 4: Running the Laptop Flat Before Diagnosing
Letting a battery discharge to 0% repeatedly before diagnosing the charging fault accelerates lithium-ion cell degradation. Each deep discharge below 10% shortens battery lifespan by an estimated 2 to 5 full charge cycles (Battery University, 2024). Keep the laptop plugged in throughout the diagnostic process to avoid this.
How to check right now: if your cycle count in BatteryInfoView is over 500 and capacity is below 50% of design spec, repeated deep discharges have likely compounded the original fault.
Quick Win: Disabling conservation mode (Mistake 2) is the fastest fix when it applies. It takes under 10 seconds, requires no technical knowledge, and resolves the issue completely in cases where it is the cause. Check it first before any other software step.
Real-world example: A marketing manager running a Dell XPS 13 reported her battery stuck at 60% for three weeks after an IT department-managed software push. The IT team had remotely enabled Dell Power Manager’s conservation mode as part of a battery longevity policy. Turning it off restored full charging immediately, and no hardware was involved at all.
Laptop Battery Not Charging: Frequently Asked Questions
The "plugged in, not charging" message in Windows usually points to a driver or firmware issue, not the charger itself. Uninstall the Microsoft ACPI-Compliant Control Method Battery driver in Device Manager and restart. If the message persists after reinstall, download the latest BIOS update from your manufacturer's support page. A new charger alone will not fix a driver or firmware fault.
Run BatteryInfoView (free, Windows) or coconutBattery (free, Mac) and check your current full charge capacity against the design capacity. If current capacity is below 40% of design capacity and your cycle count exceeds 500, the battery needs physical replacement. If capacity is above 60% and cycles are under 400, start with driver and firmware fixes before buying a new battery.
A damaged cable can supply enough power to run the laptop but not enough to charge the battery under load. A laptop requires significantly more power when running applications than when idle. Test with a known-good cable of the correct wattage. For USB-C laptops, confirm the cable supports USB Power Delivery at your laptop's required voltage. A USB-C cable that only supports 5V charging will not charge a laptop that requires 20V.
Modern laptops from Dell, HP, Lenovo, Apple, and ASUS include overcharge protection that stops drawing power from the charger once the battery reaches 100%. Leaving a laptop plugged in overnight does not overcharge it. The real concern is heat: a laptop charging on a soft surface like a bed restricts airflow and raises battery temperature, which does accelerate cell degradation. Use a hard, flat surface for overnight charging.
A charge cap at 80% is almost always conservation mode or battery threshold settings, not a hardware fault. Check Lenovo Vantage, Dell Power Manager, HP Support Assistant, or MyASUS depending on your brand. If no app shows a charge limit, check your BIOS settings under the Power or Battery section. If neither reveals a cap, run a battery health report with powercfg /batteryreport in PowerShell to confirm the battery's actual capacity versus its design specification.
Conclusion
Laptop battery not charging is one of the most solvable hardware problems on the market, as long as you run the software checks before touching any physical components. The five-step process above resolves the problem in the majority of cases at zero cost and in under 15 minutes.
In the next 10 minutes: open BatteryInfoView, note your current capacity versus design capacity, then check your OEM power management app for conservation mode. If capacity is above 60% and no conservation mode is active, uninstall and reinstall the ACPI battery driver. That sequence covers the top three causes and requires no tools, no parts, and no technical background.