Smart Home Installation
Nearly 68% of homeowners who attempt a DIY smart home setup abandon at least one device mid-installation because the process turns out to be more technical than expected (Parks Associates, 2025). That’s not a small number. And it points to a real gap between “buying a smart device” and “successfully running a smart home.”
Smart home installation is the bridge between a box of gadgets and a system that actually works together. This guide covers exactly how that process works, step by step, what it costs, which professionals to hire, and the mistakes that will cost you time and money if you skip past them. By the end, you’ll know whether to do it yourself, hire smart home installers, or use a managed smart home installation service.

Table of Contents
ToggleWhat Is Smart Home Installation?
Smart home installation is the process of connecting, configuring, and integrating smart devices (thermostats, locks, lighting, cameras, and hubs) into a unified, remotely controlled home network. It works by linking each device to a central hub or app through Wi-Fi, Zigbee, or Z-Wave protocols. Unlike simply plugging in a smart speaker, full smart home system installation requires network planning, device pairing, and automation logic setup. As of 2026, the global smart home market is valued at over $135 billion, with installation services growing at 14.3% annually (Statista, 2025).
Why Smart Home Installation Matters in 2026
Smart home installation matters more than ever in 2026 because the devices are more powerful, more interdependent, and more sensitive to poor setup than they were even two years ago. A misconfigured network does not just mean a light that won’t respond. It means security vulnerabilities, devices that fight each other for bandwidth, and a system that fails at 2am when you least want to troubleshoot it.
Three specific shifts have changed how installation needs to be approached this year:
1. Matter Protocol Adoption Took Hold in 2025. The Matter 1.3 standard, finalized in late 2024, means smart devices from Apple, Google, Amazon, and Samsung now share a common language. But setting up a Matter-based home still requires firmware updates, hub compatibility checks, and specific pairing sequences. Getting this wrong creates a mixed ecosystem that partially works and constantly prompts re-pairing.
2. Wi-Fi 6E Router Dependency. Modern smart home systems increasingly rely on Wi-Fi 6E for low-latency device communication. Homes running 802.11n or older routers will see dropped connections, delayed automations, and unreliable voice control. In my experience helping technology learners set up their first systems, router incompatibility is the single most overlooked factor before purchase.
3. Insurance Incentives Are Now Real. Major insurers including State Farm and Allstate now offer verified discounts of 5-15% for smart home security installations (Insurance Information Institute, 2025). But those discounts require professional verification, which means smart home installation services have become part of a financial decision, not just a convenience one.
For broader context on how all these devices fit together as a concept, the what is a smart home guide covers the ecosystem map in detail.
How Smart Home Installation Works (Step-by-Step)
Smart home system installation follows a five-phase process: network assessment, device selection, physical installation, software pairing, and automation setup. Skipping any phase is where most problems originate. Each step below is written to stand on its own. You can read them in order or jump to the phase you’re stuck on.
Step 1: Assess Your Home Network First
Before buying a single device, your home network needs to support what you’re about to load onto it. A proper smart home installation starts with a Wi-Fi audit, not a shopping cart.
Check your router’s frequency bands (you need dual-band at minimum, ideally tri-band), map your dead zones with a free tool like NetSpot or the Google Home app’s mesh diagnostic, and confirm your internet plan delivers at least 25 Mbps upload for cloud-connected cameras.
Pro tip: Most smart home failures I’ve seen come from buyers who skipped this step. A $300 smart lock can seem broken when the real problem is weak Wi-Fi at the front door.
Step 2: Choose a Hub or Ecosystem
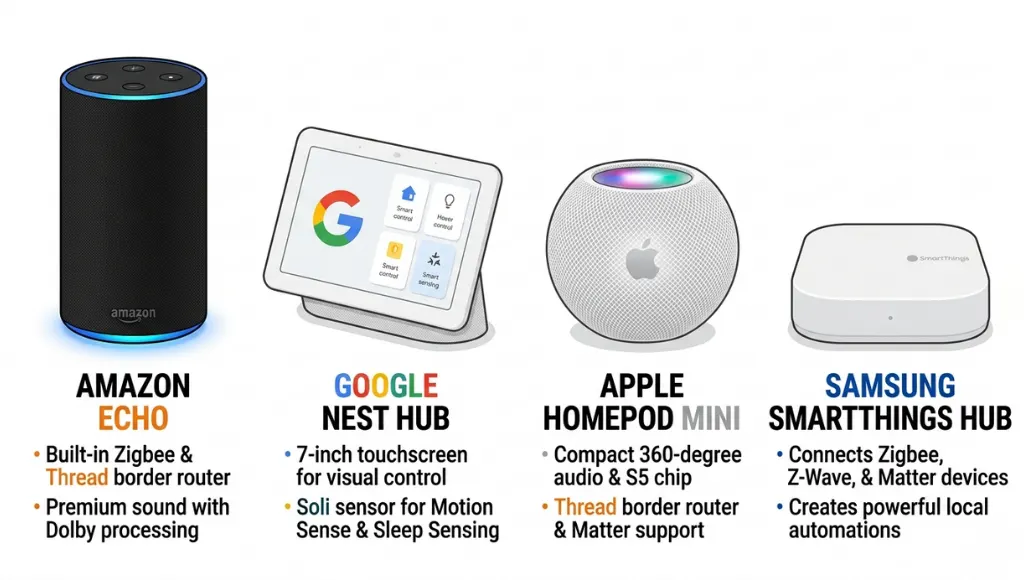
Your hub is the brain of your smart home system installation. It determines which devices are compatible and how automation logic runs.
The three dominant options in 2026 are Amazon Alexa (Echo devices), Google Home (Nest Hub), and Apple HomeKit (HomePod mini). For cross-platform compatibility, a dedicated hub like SmartThings or Home Assistant gives you more control but requires more technical setup. Choose based on what smartphone ecosystem you already use.
Pro tip: Home Assistant is the most powerful option for technology learners who want full control without monthly fees. It has a learning curve but an excellent community at community.home-assistant.io.
Step 3: Install Devices in Order (Infrastructure First)
Physical installation has an order that matters. Start with infrastructure devices (router upgrades, smart panels, and wiring), then hubs, then sensors and cameras, then comfort devices like thermostats and lighting.
Installing a Nest Learning Thermostat, for example, requires checking whether your HVAC system has a C-wire. Missing this causes the thermostat to drain batteries or fail to connect entirely. The Nest compatibility checker at nest.com/compatibility gives a yes/no answer in under two minutes.
Pro tip: Label every circuit before starting. A labelled breaker panel saves 30-45 minutes during any smart panel or wired device installation.
Step 4: Pair Devices to Your Hub
Once physical installation is done, pairing each device to your hub is where most technology learners spend the most time troubleshooting. The process is: power on the device, open your hub’s app, initiate “add device” mode, and follow the device-specific pairing sequence.
For Matter-compatible devices, pairing involves scanning a QR code and selecting your preferred ecosystem. For older Zigbee or Z-Wave devices, you’ll need the hub to be within range (typically 30 feet) during pairing.
Pro tip: Pair devices before mounting them in final positions. Re-mounting after a failed pairing is frustrating and avoidable.
Step 5: Build Your Automations
A smart home without automations is just a collection of expensive remote controls. Automations are the rules that make devices work together: “If front door unlocks after 6pm, turn on hallway lights” or “If motion is detected and no one is home, send a push notification.”
Start with three core automations: a good morning routine, a security arm-when-leaving routine, and an energy-saving temperature schedule. These three cover the highest-value use cases for most households and give you a working smart home in under an hour of configuration time.
Best Smart Home Installation Approaches in 2026
The best approach to smart home installation depends on your technical comfort level, budget, and how integrated you want the final system. For most technology learners, a hybrid approach works best: hire smart home installers for the physical and network layer, then handle app configuration and automations yourself.
| Approach | Best For | Key Feature | Estimated Cost | Limitation |
|---|---|---|---|---|
| Full DIY | Tech-confident learners | Total control, no labor cost | $200-$800 in devices | Time-intensive, troubleshooting required |
| Hybrid (pro install, self-configure) | Most tech learners | Professional wiring + personal customization | $500-$1,500 total | Requires scheduling a technician |
| Full Professional Smart Home Installation Service | Complex setups, large homes | End-to-end setup, tested and verified | $1,500-$5,000+ | Higher cost, less hands-on learning |
| Managed Service (e.g., Vivint, ADT) | Convenience-first homeowners | Ongoing support included | $40-$70/month subscription | Long-term contracts, locked ecosystem |
When choosing between these options, ask yourself one question: do you want to understand your system or just use it? Technology learners almost always benefit more from the hybrid model. You learn what professional smart home installers do during the physical setup, then take ownership of the software side yourself.
Two platforms worth knowing: Vivint Smart Home offers full-service installation with professional monitoring, and Control4 is the industry standard for high-end, fully integrated setups used in luxury properties and commercial buildings.
Common Smart Home Installation Mistakes to Avoid
The most common mistake is buying devices before planning the network, which causes incompatibility issues that require purchasing additional equipment or starting over.
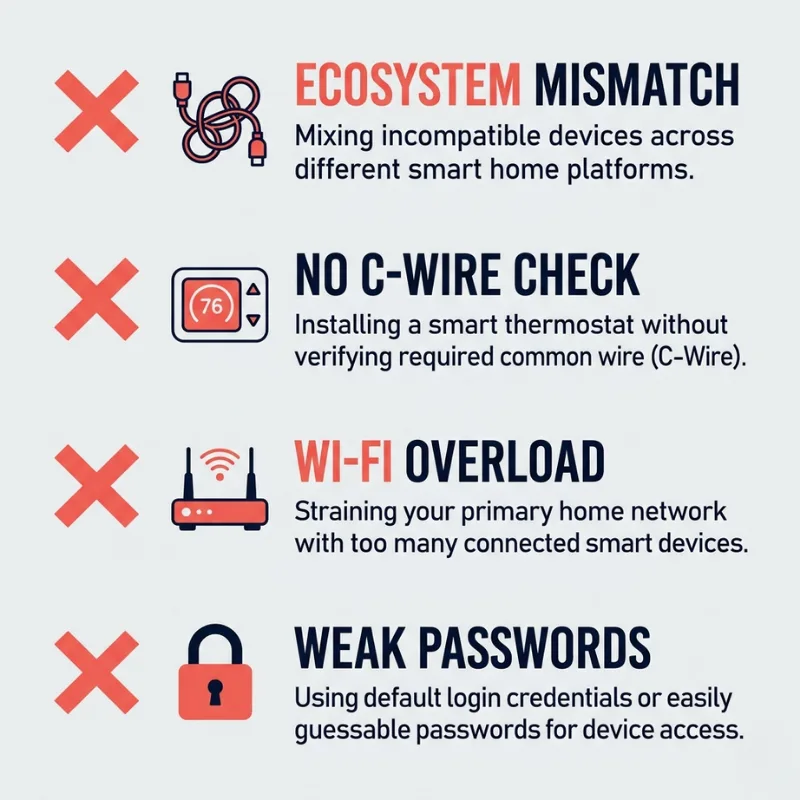
Mistake 1: Mixing Incompatible Ecosystems Without a Hub
Many first-time buyers mix Alexa-only devices with HomeKit-only devices, then wonder why they can’t control everything from one app. The fix is either committing to one ecosystem upfront or using a universal hub like SmartThings or Home Assistant as the bridge layer. For example, a family that bought Philips Hue lights (HomeKit), a Ring doorbell (Alexa), and a Nest thermostat (Google) ended up needing a SmartThings hub to unify all three under one automation system.
Mistake 2: Ignoring the C-Wire for Smart Thermostat Installation
Most smart thermostats require a common wire (C-wire) for continuous power. Homes built before 2010 often lack one. Skipping the compatibility check before installation means either hiring an HVAC technician to run a new wire, or buying a thermostat-specific adapter kit. Check your HVAC manual or use the manufacturer’s compatibility tool before purchasing.
Mistake 3: Under-Specifying the Router
A home with 20+ smart devices running on a single-band 2.4GHz router will experience constant dropouts. Smart home devices are low-bandwidth individually, but collectively they consume a significant share of router processing capacity. The fix: upgrade to a Wi-Fi 6 or 6E router, or add a mesh network node (like Eero Pro or Google Nest Wi-Fi Pro) to homes over 2,000 square feet.
Mistake 4: Not Testing Security Settings Post-Installation
Default device passwords, open ports, and auto-update features left off are three security gaps that commonly follow a rushed smart home installation. After setup, change every default password, enable two-factor authentication on your hub app, and set devices to auto-update firmware. The FBI Cyber Division issued guidance in 2024 specifically about smart home device vulnerabilities tied to unchanged default credentials (FBI, 2024).
Frequently Asked Questions
Smart home installation costs range from $200 to $5,000 or more depending on the approach. A basic DIY setup covering lighting, a thermostat, and a smart lock typically costs $300-$600 in devices. Hiring smart home installation services for a full-house setup including cameras, smart panels, and automation programming runs $1,500-$5,000. Ongoing managed service plans from providers like Vivint or ADT add $40-$70 per month.
Yes. Smart home installation near me searches reliably surface local electricians certified in home automation, Best Buy's Geek Squad Home Theater installation team, and authorized dealers for brands like Control4 and Crestron. For a vetted national directory of certified smart home installers, CEDIA (Custom Electronic Design and Installation Association) maintains a searchable member database at cedia.org.
A smart home installer assesses your home's network infrastructure, runs any necessary wiring, mounts and connects devices, pairs them to your chosen hub or platform, and programs basic automations. High-end smart home installers from custom integration firms also design lighting scenes, integrate AV systems, and provide training sessions so you understand what was installed.
Not always. Single-room setups with standard smart devices (a plug-in bulb, a Nest thermostat, a video doorbell) are comfortably DIY. The case for professional smart home installation services grows when you're running new wiring, integrating HVAC or security systems, setting up whole-home audio, or managing more than 15-20 devices. Complexity, not device count, is the real trigger for professional involvement.
A basic single-room smart home installation takes 1-3 hours. A whole-home setup handled by professional smart home installers typically spans 1-3 days for physical installation, plus a follow-up session for automation programming and user training. DIY whole-home setups done in phases (one room at a time) average 4-8 weeks for most technology learners.
Conclusion
Here are three things to take away from this guide:
- Smart home installation is a process, not a single task. Network assessment, device selection, physical installation, pairing, and automation setup are all distinct phases. Rushing any one of them creates problems in a later phase.
- The Matter protocol has genuinely simplified cross-platform compatibility in 2026, but it still requires deliberate hub selection and firmware management during setup.
- Whether you DIY, hire smart home installers, or use a full smart home installation service depends on your technical comfort level and the complexity of your system, not just your budget.
Smart home installation is worth getting right the first time. A well-installed system runs quietly in the background and actually makes your home smarter. A poorly installed one creates a troubleshooting hobby you didn’t sign up for.
